Additional options allow you to change the appearance and behavior of the application, and are specified in the configuration file /etc/microimpuls/portal/client.js.
The following options are available for the futuristic interface.
Logic of work
Authorization regime
Option name: auth_mode, data type: string.
Possible values:
- password - by login and password (by default).
- abonement - by login (without password).
- device_uid A unique device identifier (usually a MAC address) or IP address. In case of unsuccessful authorization, the subscriber will be offered authorization by login and password.
- device_uid_wo_fallback - the same as device_uid, but without processing some situations of unsuccessful authorization and transition to login and password authorization.
- phone number login is carried out as a bundle of login / password (as a value) password) and telephone number/password.
Example:
var CLIENT_SETTINGS = {
///...
'auth_mode': 'password'
};
Attempting authorization without stored credentials
Option name: try_to_login_without_saved_credentials, data type: bool.
Possible values:
- true - at the first download of the portal when using the authorization mode password will be an attempt to authenticate (call API Login method) with an empty login and password. Authorization will be successful if an account with authorized authorization by IP or UID is found in Smarty and if these values match the corresponding values. This combination of authorization logic may be necessary for certain specific work scenarios.
- falsely - in the mode of authorization password and with an empty saved password, the authorization attempt will not be carried out (by default).
Example:
var CLIENT_SETTINGS = {
///...
-try_to_login_without_saved_credentialsfalse:
};
Missing service errors of authorization
Option name: omit_unsuccessful_login, data type: bool.
Possible values:
- true In case of errors with codes 3, 4, 7, 10, 11, 12 (codes error method TVMW API Login), the screen with the error information will be skipped and the login and password input form will be immediately opened (except for the mode)
auth_mode*wo_fallback). - falsely if any errors occur, a screen with error information (by default) will be shown.
Example:
var CLIENT_SETTINGS = {
///...
-omit_unsuccessful_loginfalse:
};
Verification of additional account status
Option name: check_account_status_reason, data type: bool.
Possible values:
- true Additional account status will be checked even in case of successful authorization (by default). For example, if the account is active, but the additional status is “Blocked for debt”, then the corresponding authorization error will be issued in the portal.
- falsely additional status will not be checked.
Example:
var CLIENT_SETTINGS = {
///...
-check_account_status_reason': true
};
Displaying virtual tariffs
Option name: use_virtual_packages, data type: bool.
Responsible for removing virtual tariffs in the list.
Possible values:
- true only virtual rates (except hidden, disabled and inaccessible) are displayed.
- falsely all tariffs are displayed: normal and virtual (except hidden, disabled and inaccessible) (by default).
Example:
var CLIENT_SETTINGS = {
///...
'use_virtual_packages': true
};
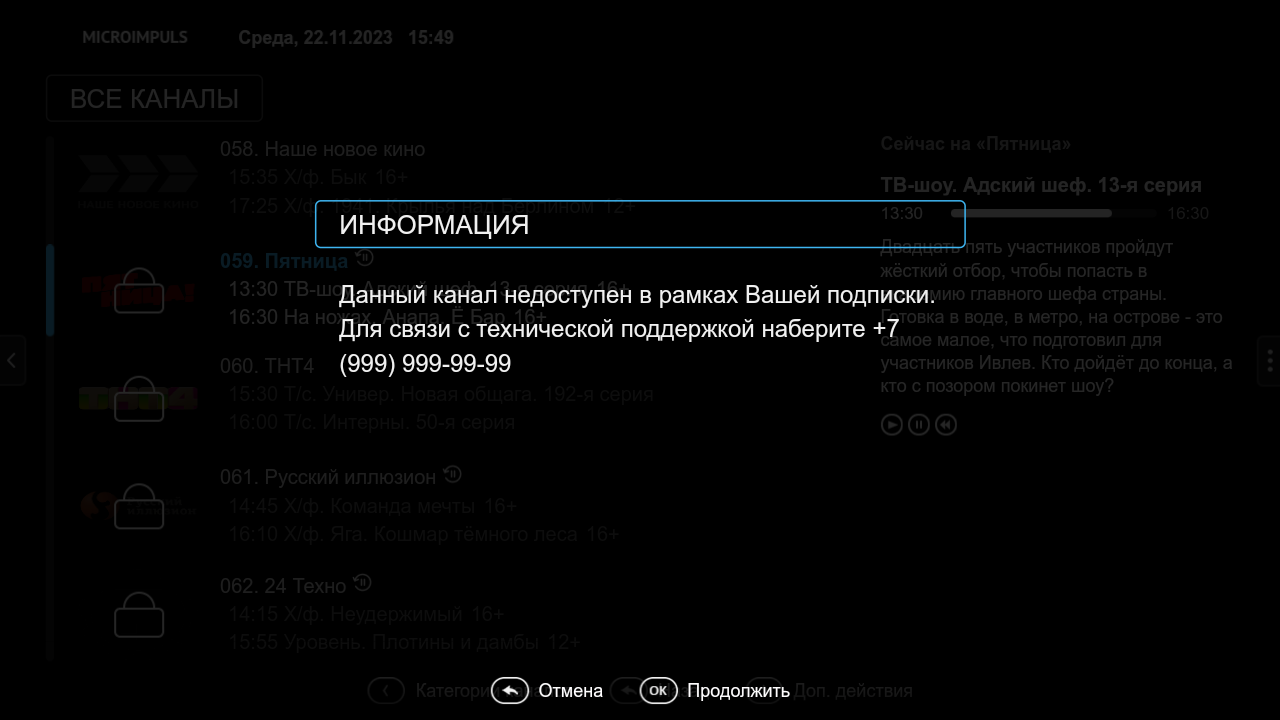
Contact Technical Support Service
Option name: support_info, data type: string.
Appearance on the pop-up screen with information on how to contact technical support. It will be displayed when you try to run a channel that is not available under current tariffs. Warning: poppa will appear in case of value show_packages: false.
Example:
var CLIENT_SETTINGS = {
///...
"support_info": "For technical support, dial +7 (999) 999-99-99"
};
The possibility of registration via SMS
Option name: registration_available, data type: bool.
Possible values:
- true The registration button is displayed via SMS.
- falsely it is not displayed (by default).
To be able to register via SMS, you need to properly configure integration with the SMS gateway on the Smarty server side.
Example:
var CLIENT_SETTINGS = {
///...
'registration_available': false
};
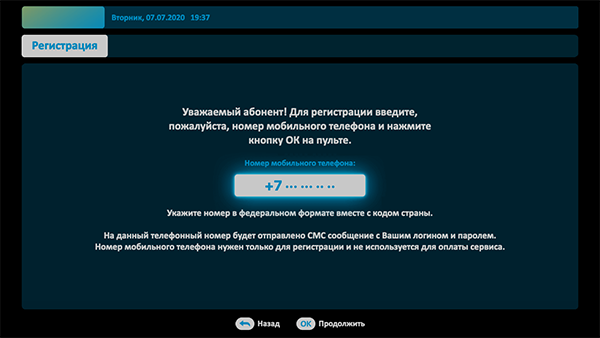
Mobile phone number mask in the registration screen
Option name: registration_phone_mask, data type: string.
By default +7 ??? ??? ?? ??.
The mask uses a special symbol ?, instead of which the input value will be substituted, the remaining characters will be displayed as is.
Example:
var CLIENT_SETTINGS = {
///...
'registration_phone_mask': '+7??????????
};
Auto-registration at the first launch
Option name: allow_autoregistration, data type: bool.
Possible values:
- true At the first launch of the application, a new account is automatically registered and the device is linked via UID.
- falsely auto registration is disabled (by default).
Example:
var CLIENT_SETTINGS = {
///...
'allow_autoregistration': false
};
Possibility of password recovery by sending SMS
Option name: show_password_recovery, data type: bool.
Possible values:
- true In the authorization screen, the user can use the password recovery function via SMS.
- falsely The password recovery function via SMS will not be available (by default).
To be able to recover a password via SMS, you need to properly configure integration with the SMS gateway on the Smarty server side.
Example:
var CLIENT_SETTINGS = {
///...
'show_password_recovery': false
};
The ability to enter characters in the password
Option name: is_letter_in_password, data type: bool.
Possible values:
- true numbers and letters can be entered in the password.
- falsely only numbers can be entered in the password (by default).
Example:
var CLIENT_SETTINGS = {
///...
'is_letters_in_password': false
};
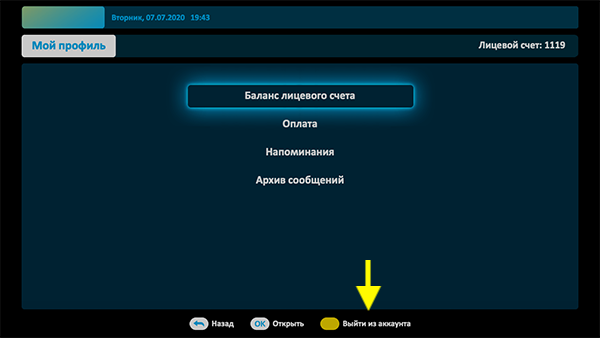
Display of the button and the ability to change the account
Option name: show_logout_option, data type: bool.
Possible values:
- true In the “My Profile” screen, when you press the yellow button, the user will be able to log out of his account and log in under another account.
- falsely the ability to log out will not be available (by default).
Example:
var CLIENT_SETTINGS = {
///...
'show_logout_option': false
};
Saving the login and password in the input fields on the authorization screen when restarting the application
Option name: restore_login_form_input_from_settings, data type: bool.
Possible values:
- true when restarting the application and in the case of a logout in the input fields, the login and password from the previous session will be filled on the authorization screen.
- falsely the data will not be completed (by default).
It is recommended to use this option in the authorization method password to avoid loss of password by subscribers after logout.
Example:
var CLIENT_SETTINGS = {
///...
'restore_login_form_input_from_settings': false
};
Reboot the device after the first activation
Option name: reboot_device_after_login_with_password, data type: bool.
Possible values:
- true - after the subscriber is authorized with a login and password through the authorization form, the device will be rebooted.
- falsely no reboot will be made, the application will be downloaded as usual (by default).
It can be used to perform system billing operations during the initial “activation” of the prefix by the subscriber.
Example:
var CLIENT_SETTINGS = {
///...
'reboot_device_after_login_with_password': false
};
Open the main menu after the start of the application
Option name: show_main_menu_on_first_launch, data type: bool.
Possible values:
- true - after launching the application, open the main menu (by default).
- falsely - after launching the application, open a full-screen player.
Example:
var CLIENT_SETTINGS = {
///...
'show_main_menu_on_first_launch': true
};
Opening the list of channels and launching the first channel on the list after the first launch of the application
Option name: show_tv_menu_and_play_first_channel_on_first_launch, data type: bool.
Possible values:
- true after the first launch of the application, a list of channels will be opened and the playback of the first channel on the list will automatically start.
- falsely behavior by default (by default).
Example:
var CLIENT_SETTINGS = {
///...
'how_tv_menu_and_play_first_channel_on_first_launch': false
};
Saving the selected category of TV channels when restarting the application
Option name: save_last_tvcategory, data type: bool.
Possible values:
- true after launching the application, the category that was selected before closing the application will be selected, and when returning from the full-screen player to the channel list, the current focus will be placed on the last selected category and the last playable channel.
- falsely After launching the application, the category “All channels” will be selected (by default).
Example:
var CLIENT_SETTINGS = {
///...
'save_last_tvcategory': false
};
Delayed application loading at start
Option name: loading_timeout, data type: int.
The option allows you to set the number of milliseconds by which the initial download of the portal will be delayed. It can be used, for example, to customize the portal to display a welcome picture before launching.
By default 1000, which corresponds to one second. If you specify a zero or too small value, then some application functions on some devices may be disrupted due to asynchronous implementation of the API of some devices. For example, a small delay is necessary to be able to determine the device not only by type, but also by model (if Smarty configures the appropriate types of devices with a model) for Android consoles.
Example:
var CLIENT_SETTINGS = {
///...
'loading_timeout': 1000
};
Disabling the SET button on MAG consoles
Option name: disable_set_button_on_mag, data type: bool.
Possible values:
- true The SET (Setup) button on the MAG console will be blocked.
- falsely the button will work according to the settings in the firmware (by default).
Example:
var CLIENT_SETTINGS = {
///...
'disable_set_button_on_mag': false
};
Possibility of opening the Dune portal
Option name: show_media_port_service_on_dune, data type: bool.
Possible values:
- true In the "Services" section, you will be able to open the built-in Dune portal.
- falsely the portal transition button will not be shown (by default).
Example:
var CLIENT_SETTINGS = {
///...
'show_media_portal_service_on_dune': false
};
Selection of the application interface used through account settings in Smarty
Option name: check_account_template, data type: bool.
Possible values:
- true After logging in, the template installed in the Smarty account settings will be checked, and if it differs from the one used, the application will be restarted in the desired template (by default).
- falsely The set template in the account settings in Smarty will be ignored.
Example:
var CLIENT_SETTINGS = {
///...
'check_account_template': true
};
Suspension of server requests in Stand-By mode
Option name: block_request_in_standby, data type: bool.
Possible values:
- true This includes blocking requests to the server if the device is in Stand-By mode. After leaving Stand-By, sending requests to the server is restored, however, the data in the interface may be outdated for some time.
- falsely Requests do not stop even in Stand-By, the data displayed in the interface does not become outdated (by default).
The option allows you to save server resources in moments of downtime of user devices.
Example:
var CLIENT_SETTINGS = {
///...
'block_requests_in_standby': false
};
Stand-By timer for LG WebOS with screensavers enabled
Option name: lg_webos_standby_timer, data type: int.
When the screensaver_images array is filled (not empty), the Stand-By timer settings in the device settings are replaced by calling screensavers. To return the usual functionality of the Stand-By timer, an option is necessary lg_webos_standby_timer. By default 0.
WarningWhen switching to Stand-By mode, this option returns to the stream, which is played against the background. In the absence of a playable stream against the background, a return to the full-screen player does not occur.
Example:
var CLIENT_SETTINGS = {
///...
'lg_webos_standby_timer': 0
};
Frequency of date and time update in bar status
Option name: time_update_interval, data type: int.
It allows you to set the date and time update interval in the upper status of the portal bar, in milliseconds. By default 60000.
Due to asynchronous operations, sometimes a situation can arise when the transmission program is already updated, and the time remains the same. The subscriber may feel that time is frozen or lagged. To eliminate this problem, you can reduce this interval, then the time will be updated more often (by default 1 time per minute).
Example:
var CLIENT_SETTINGS = {
///...
'time_update_interval': 60,000
};
Update to build the application on Android STB/TV
Option name: app_package_updating_url, data type: string.
When specifying the URL to download apk in this option, the application will attempt to download it and self-update it. When updating, the current version of the application is checked - the download and install mechanism is launched only if the version specified in the url is larger than the current version of the installed apk (in the example below, the version is a substring) 1.0.0).
The option is only available for Android STB/TV builds over 2.3.
Example:
var CLIENT_SETTINGS = {
  // …
  'app_package_updating_url': "http://your-website.com/example-app-1.0.0_100100.apk"
};
Update build launcher on Android STB/TV
Option name: launcher_package_updating_url, data type: string.
When specifying the URL to download apk in this option, the application will attempt to download it and self-update it. When updating, the current version of the launcher application is checked - the download and installation mechanism is launched only if the version specified in the url is larger than the current version of the installed launcher (in the example below, the version is a substring) 1.0.0).
The option is only available for launcher builds for Android STB/TV versions over 2.3.
Example:
var CLIENT_SETTINGS = {
  // …
  "launcher_package_updating_url": "http://your-website.com/example-launcher-1.0.0_100100.apk"
};
Enabling the system debugging console on a device with a specific User-Agent
Option name: enable_system_debug_for_user_agent, data type: string.
Example:
var CLIENT_SETTINGS = {
///...
"enable_system_debug_for_user_agent": "Mozilla/5.0 (Web0S; Linux/SmartTV) AppleWebKit/537.36"
};
Enabling the system debugging console on a device with a specific UID
Option name: enable_system_debug_for_device_uid, data type: string.
Example:
var CLIENT_SETTINGS = {
///...
"enable_system_debug_for_device_uid": "a0:b1:c2:d3:e4:f5"
};
Integration with MVision
Frequency of sending system metrics to MVision
Option name: monitoring_interval_sys_info, data type: int.
It allows you to set the frequency (in milliseconds) at which the portal will send system metrics from the device to the Microimpuls MVision server. Sending metrics should also be enabled in the device settings in the Smarty Administrator Panel. By default 300000.
Example:
var CLIENT_SETTINGS = {
///...
"monitoring_interval_sys_info": 300,000
};
Frequency of sending performance metrics and errors in MVision
Option name: monitoring_interval_metrics, data type: int.
It allows you to set the frequency (in milliseconds) at which the portal will send performance and video quality metrics from the device to the Microimpuls MVision server. Sending metrics should also be enabled in the device settings in the Smarty Administrator Panel. By default 15000.
Example:
var CLIENT_SETTINGS = {
///...
'monitoring_interval_metrics': 15,000
};
MVision server address
Option name: monitoring_server_url, data type: string.
Allows you to set the MVision server address to send statistics. If MVision and Smarty are on different servers. If the value of the option is not specified, then the statistics are sent to the main Smarty server. No default.
Example:
var CLIENT_SETTINGS = {
  // …
  'monitoring_server_url': "http://mvision.example.com"
};
Failure tolerance
Smarty backup server
Option name: reserve_api_url, data type: string.
The option allows you to set the address of the backup server Smarty. By periodically checking the availability of the main Smarty server (defined by the option) api_url) if a problem is detected, the application automatically switches to the backup server. It can be used as an additional way to ensure fault tolerance of the service.
No default.
Example:
var CLIENT_SETTINGS = {
///...
'reserve_api_url': "/reserve-api"
};
Server availability check interval
Option name: health check_interval, data type: int.
Set a time interval in milliseconds through which requests to check the status of the server will be made.
By default: 300000 (5 minutes).
Example:
var CLIENT_SETTINGS = {
///...
'health_check_interval': 300,000
};
Number of attempts to determine server availability
Option name: health_check_attemts, data type: array.
Specifies the number of attempts to connect to the Smarty server and the time intervals between attempts in case of loss of connection to the current Smarty server. It's set as an array. Each element of the array is a value in seconds through which a repeated request to the current Smarty server will be made. If none of the attempts were successful, switch to a backup Smarty server.
By default: [30].
Example:
var CLIENT_SETTINGS = {
///...
'health_check_attemts': [30,60,90]
};
Management logic
Compatibility Mode with Smart TV Platform Guidelines
Option name: samsung_guidelines_compatibility_mode, data type: bool.
Possible values:
- true Enable compatibility mode with the recommendations of Smart TV platforms.
- falsely - disable (by default).
Compatibility mode affects the logic of the portal behavior, including the assignment of remote buttons, and is necessary to include some special restrictions for easier publication in the Samsung and LG app stores.
Example:
var CLIENT_SETTINGS = {
///...
'samsung_guidelines_compatibility_mode': false
};
Behavior of the BACK button in a full-screen player
Option name: quit_player_with_back, data type: bool.
Possible values:
- true When you press the back button, you will switch to the previous screen.
- falsely When you press the back button, the previous playable channel (by default) will be enabled.
Example:
var CLIENT_SETTINGS = {
///...
'quit_player_with_back': false
};
Application navigation mode
Option name: navigation_mode, data type: string.
Possible values:
- normal normal navigation (by default).
- horizontal - transition between screens arrows remote.
Example:
var CLIENT_SETTINGS = {
///...
'navigation_mode': "normal"
};
Displaying the screen menu with remote buttons on Android devices
Option name: show_help_button_panel, data type: bool.
Possible values:
- true The screen menu will be displayed (called when the OK button is pressed) (by default).
- falsely - disconnected.
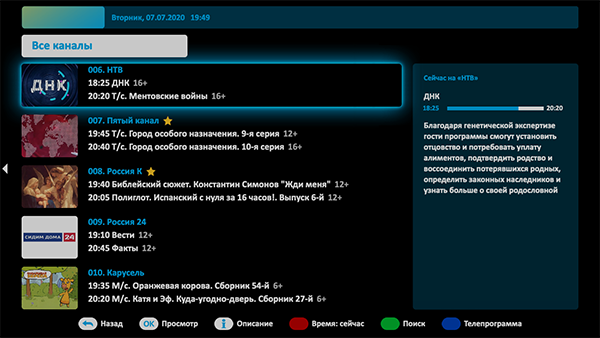
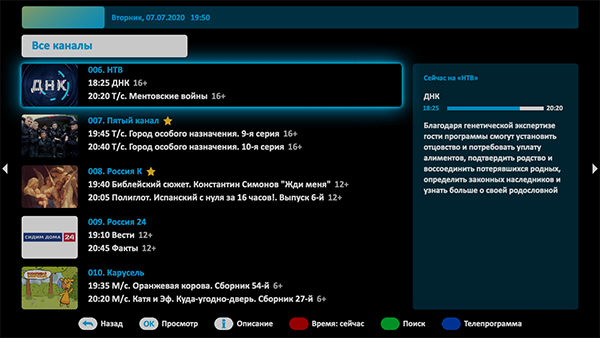
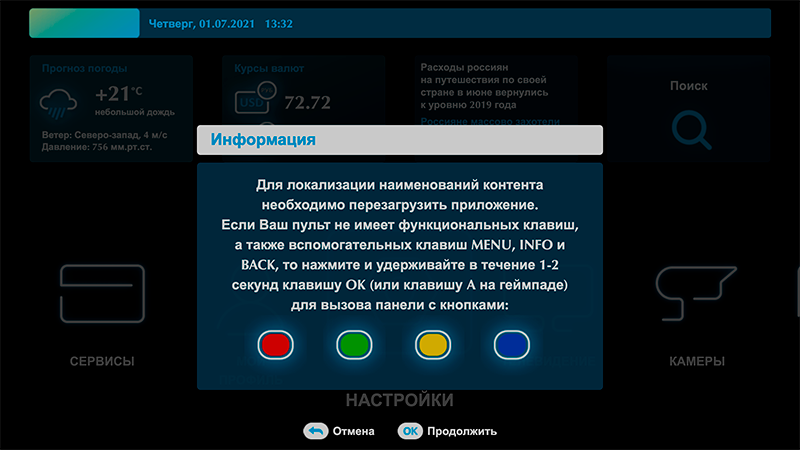
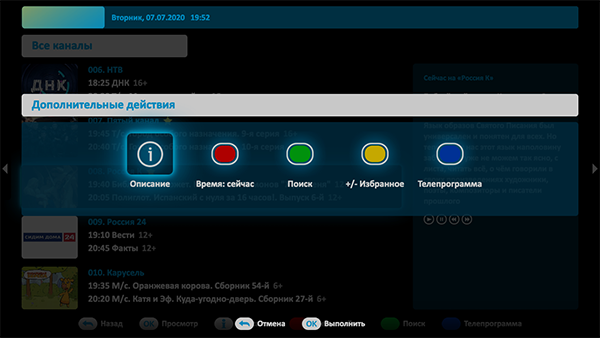
A screen menu may be necessary for remotes with a stripped-down set of buttons. When the option is turned on, the user is also shown an information popp when the device is turned on for the first time, telling how to call this panel.
Example:
var CLIENT_SETTINGS = {
///...
'show_help_button_panel': true
};
Behavior of the Back button during display of the on-screen keyboard
Option name: use_button_back_as_backspace_in_virtual_keyboard, data type: bool.
Possible values:
- true The Back button closes the on-screen keyboard.
- falsely The Back button works like Backspace and erases the last character (by default).
Example:
var CLIENT_SETTINGS = {
///...
'use_remote_button_back_as_backspace_in_virtual_keyboard': false
};
Movie search as characters are entered
Option name: enable_instant_search_for_vod, data type: bool.
Possible values:
- true movie search as characters are entered is enabled.
- falsely To perform the search, you need to press the OK button (by default).
Example:
var CLIENT_SETTINGS = {
///...
'enable_instant_search_for_vod': false
};
Switching channels with arrows up and down
Option name: switch_channels_by_up_down_keys, data type: bool.
Possible values:
- true in a full-screen player, channel switching will be additionally carried out using up and down buttons.
- falsely Default behavior, i.e. switching only with Ch+/-, PgUp-PgDown and numbers (by default).
Example:
var CLIENT_SETTINGS = {
///...
'switch_channels_by_up_down_keys': false
};
Behavior of CH+/- buttons on the channel list screen
Option name: switch_channels_page_by_ch_plus_minus_keys, data type: bool.
Possible values:
- true -channels are switched page by page (by pressing the CH+ button the channel page located at the top will open, by pressing CH- the channel page at the bottom).
- falsely Default behavior, i.e. the CH+/- buttons switch one channel at a time (by default).
Example:
var CLIENT_SETTINGS = {
///...
-switch_channels_by_ch_plus_minus_keysfalse:
};
Switching channels within the selected category
Option name: switching_channels_inside_category, data type: bool.
Possible values:
- true Switching channels with Ch+/- buttons will occur within the selected channel category.
- falsely Switching will occur within the All category, even if another category is selected (by default).
Example:
var CLIENT_SETTINGS = {
///...
'switching_channels_inside_category': false
};
Showing preliminary instructions at the first start of the application
For multilingual applications, it is very important to give the user the opportunity to choose the interface language from the very first moment of use show_setup_intro it allows you to do this and not only. When this option is enabled at the first start of the application, the user will meet the choice of the interface language, the choice of the application navigation mode based on the remote used, as well as other instructions from the operator that he will want to place in the initial configuration block of the application.
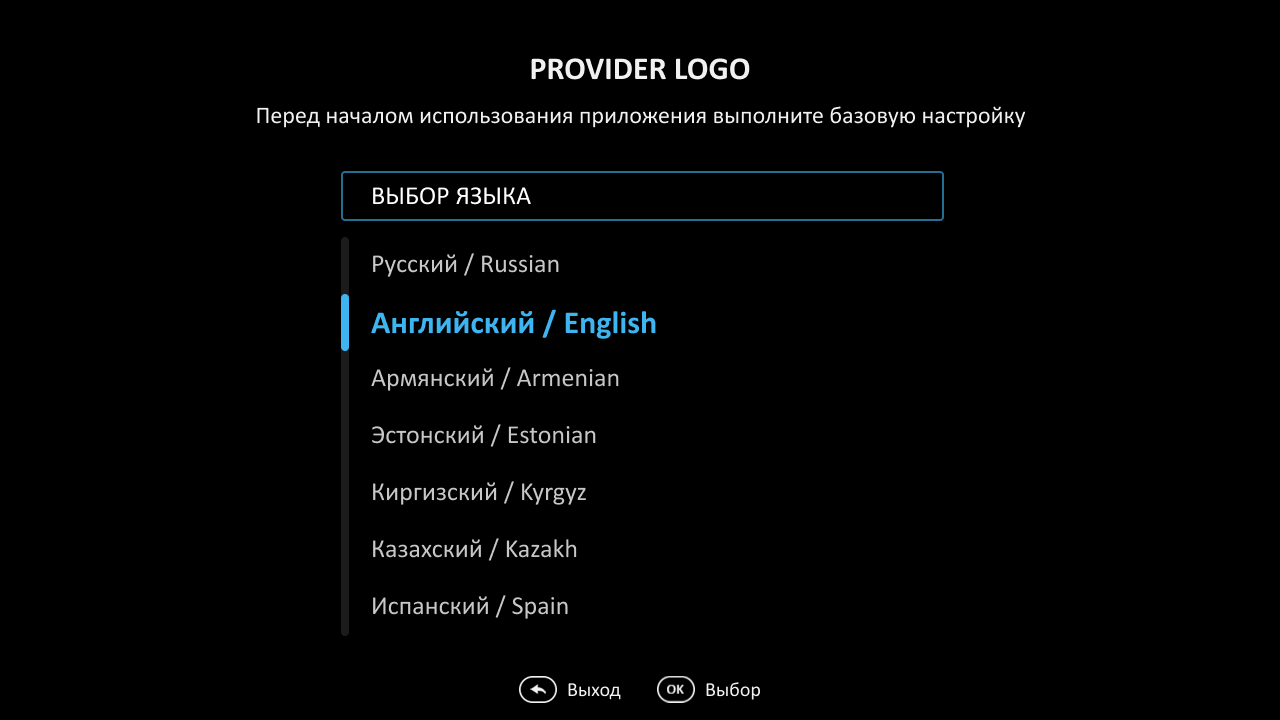
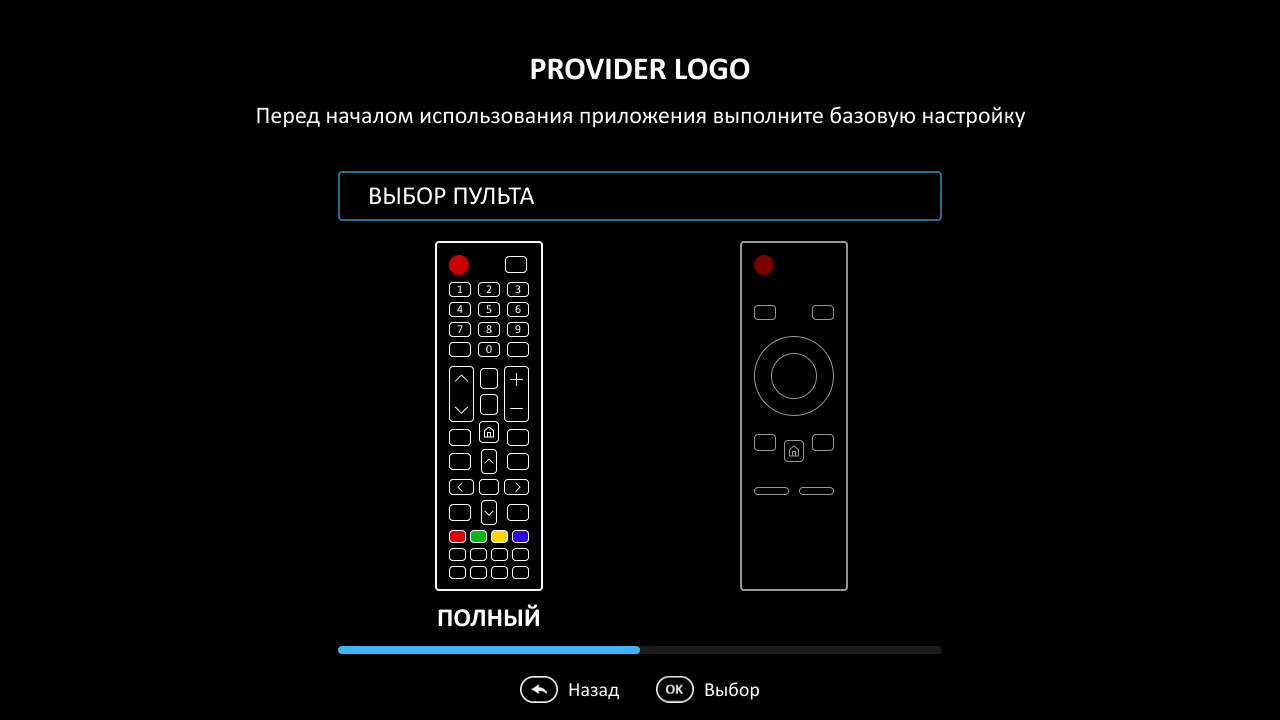
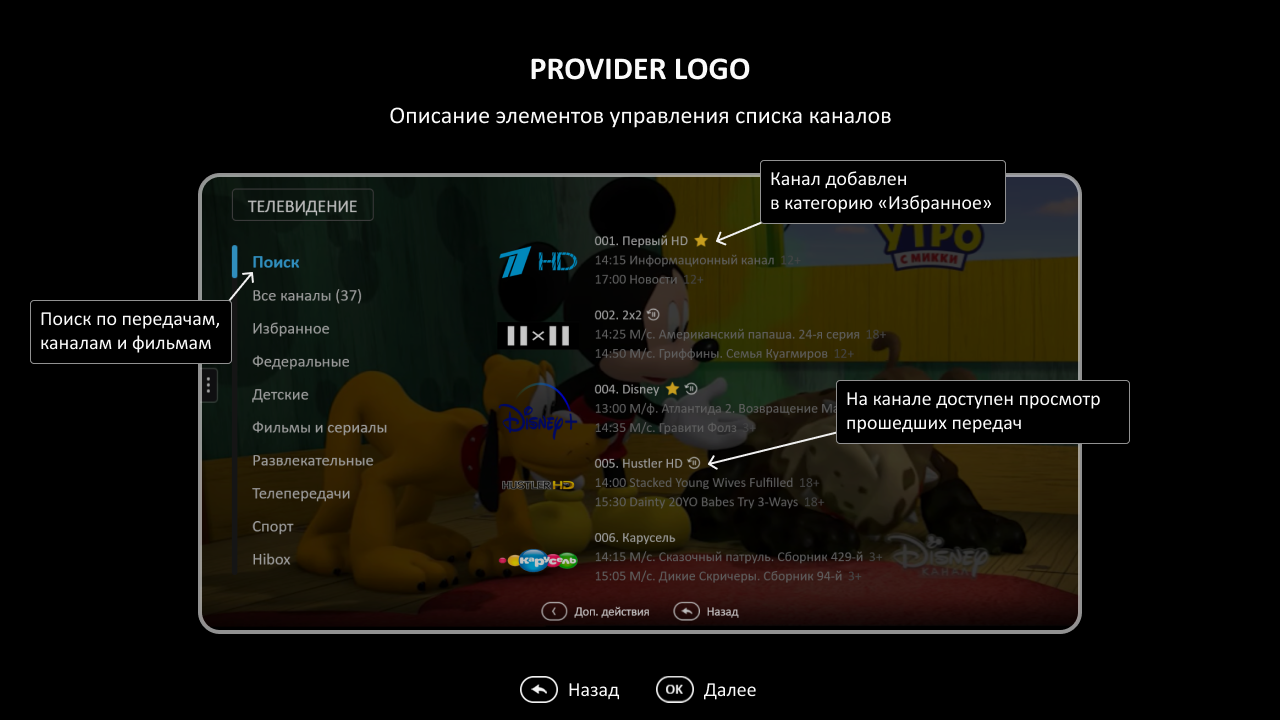
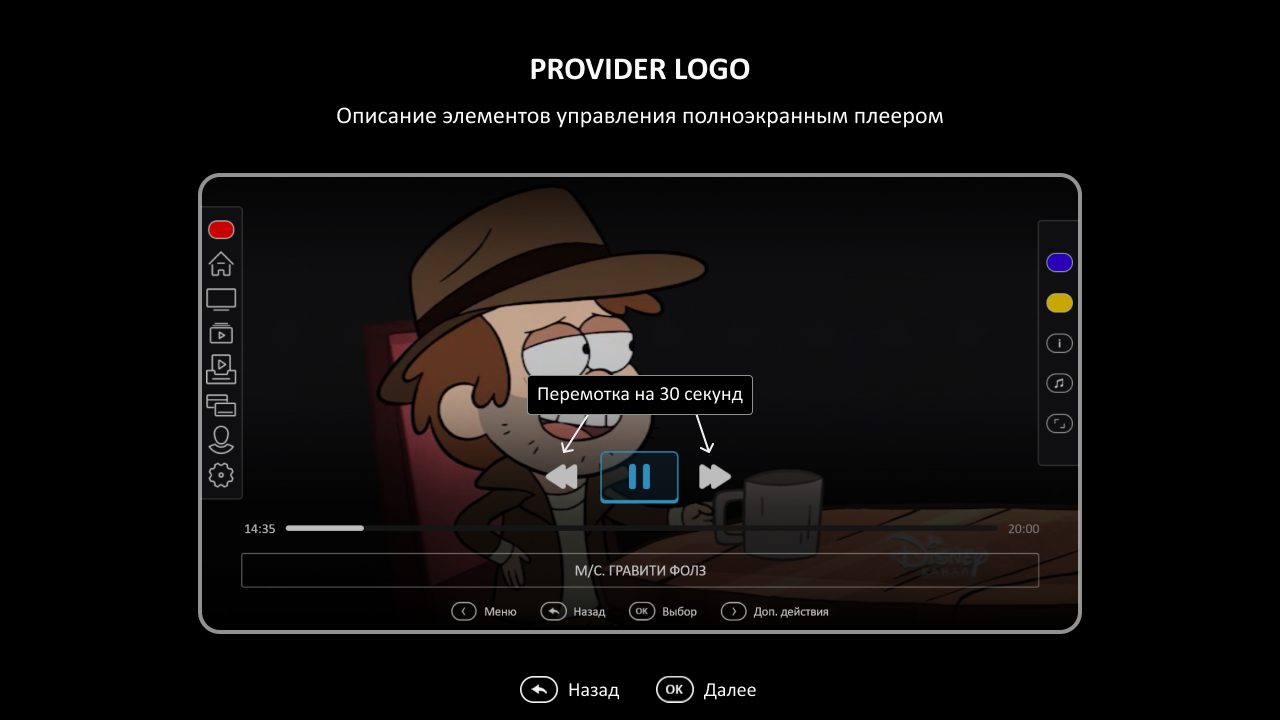
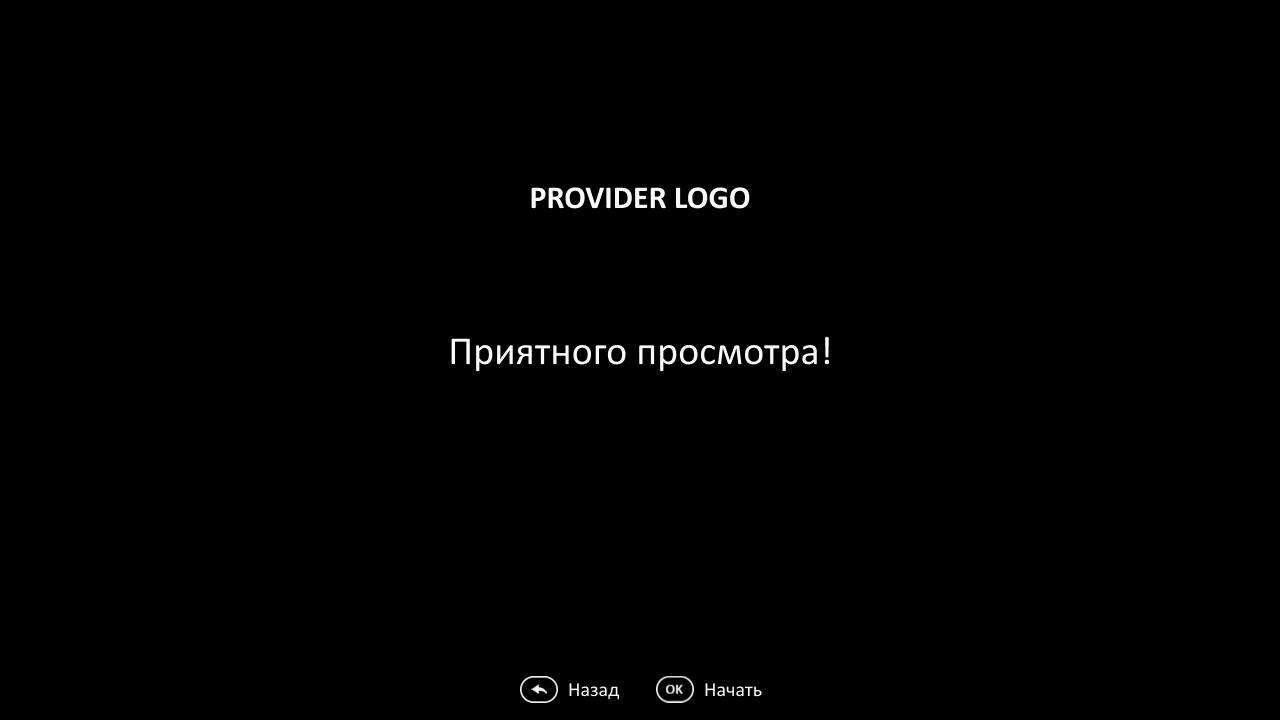
After selecting the navigation mode, you can arrange any images to the operator’s taste, and you can also request a special Figma file from your manager to create pictures-instructions for using the application similar to those presented above.
var CLIENT_SETTINGS = {
///..
  // Enabling the primary setting display
'show_setup_intro': true,

// images for display after selecting a remote with color buttons (Futuristic)
  'setup_full_remote_instructions': ['/custom/img-1.png', '/custom/img-2.png']

// images for display after selecting the remote without color buttons (Futuristic)
  'setup_limited_remote_instructions': ['/custom/img-1.png', '/custom/img-2.png']

Images for display after selecting a remote with color buttons (Futuristic X)
  'setup_full_remote_instructions_x': ['/custom/img-1.png', '/custom/img-2.png']

Images for display after selecting a remote with color buttons (Futuristic X)
  'setup_limited_remote_instructions_x': ['/custom/img-1.png', '/custom/img-2.png']
};
Inclusion of a screensaver with certain images
Option name: screensaver_images, data type: list.
Warning: to display the screensaver, you need to turn on StandBy mode, and the usual behavior of StandBy mode is also replaced. If there are several images, then their switching will be carried out for a certain period of time, which is set by the option screensaver_change_delay.
Example:
var CLIENT_SETTINGS = {
  // …
  "screensaver_images": [
	"http://smarty.example.com/1.png",
	"http://smarty.example.com/2.png",
	"http://smarty.example.com/3.png",
  ]
};
Timer switching images screensaver
Option name: screensaver_change_delay, data type: int.
Determines the required amount of time to show the screensaver images (in seconds). By default: 60.
Example:
var CLIENT_SETTINGS = {
///...
"screensaver_change_delay": 30
};
Reproduction of content
Rewinding the archive by re-querying the position
Option name: server_rewind_mode, data type: bool.
Possible values:
- true - for rewinding will be used positioning by specifying the time stamp. The URL to the thread will be re-requested from the server at each rewind (by default).
- falsely fast-forward through the stream by the seek method by means of the player (does not always work correctly due to different implementations on players, but faster).
Example:
var CLIENT_SETTINGS = {
///...
'server_rewind_mode': true
};
Player rewind step
Option name: player_wind_step, data type: int.
Allows you to set the step of rewinding the player in the archive and video library mode in one click of the rewind button. The step is set in seconds, by default 30.
Example:
var CLIENT_SETTINGS = {
///...
'player_rewind_step': 30
};
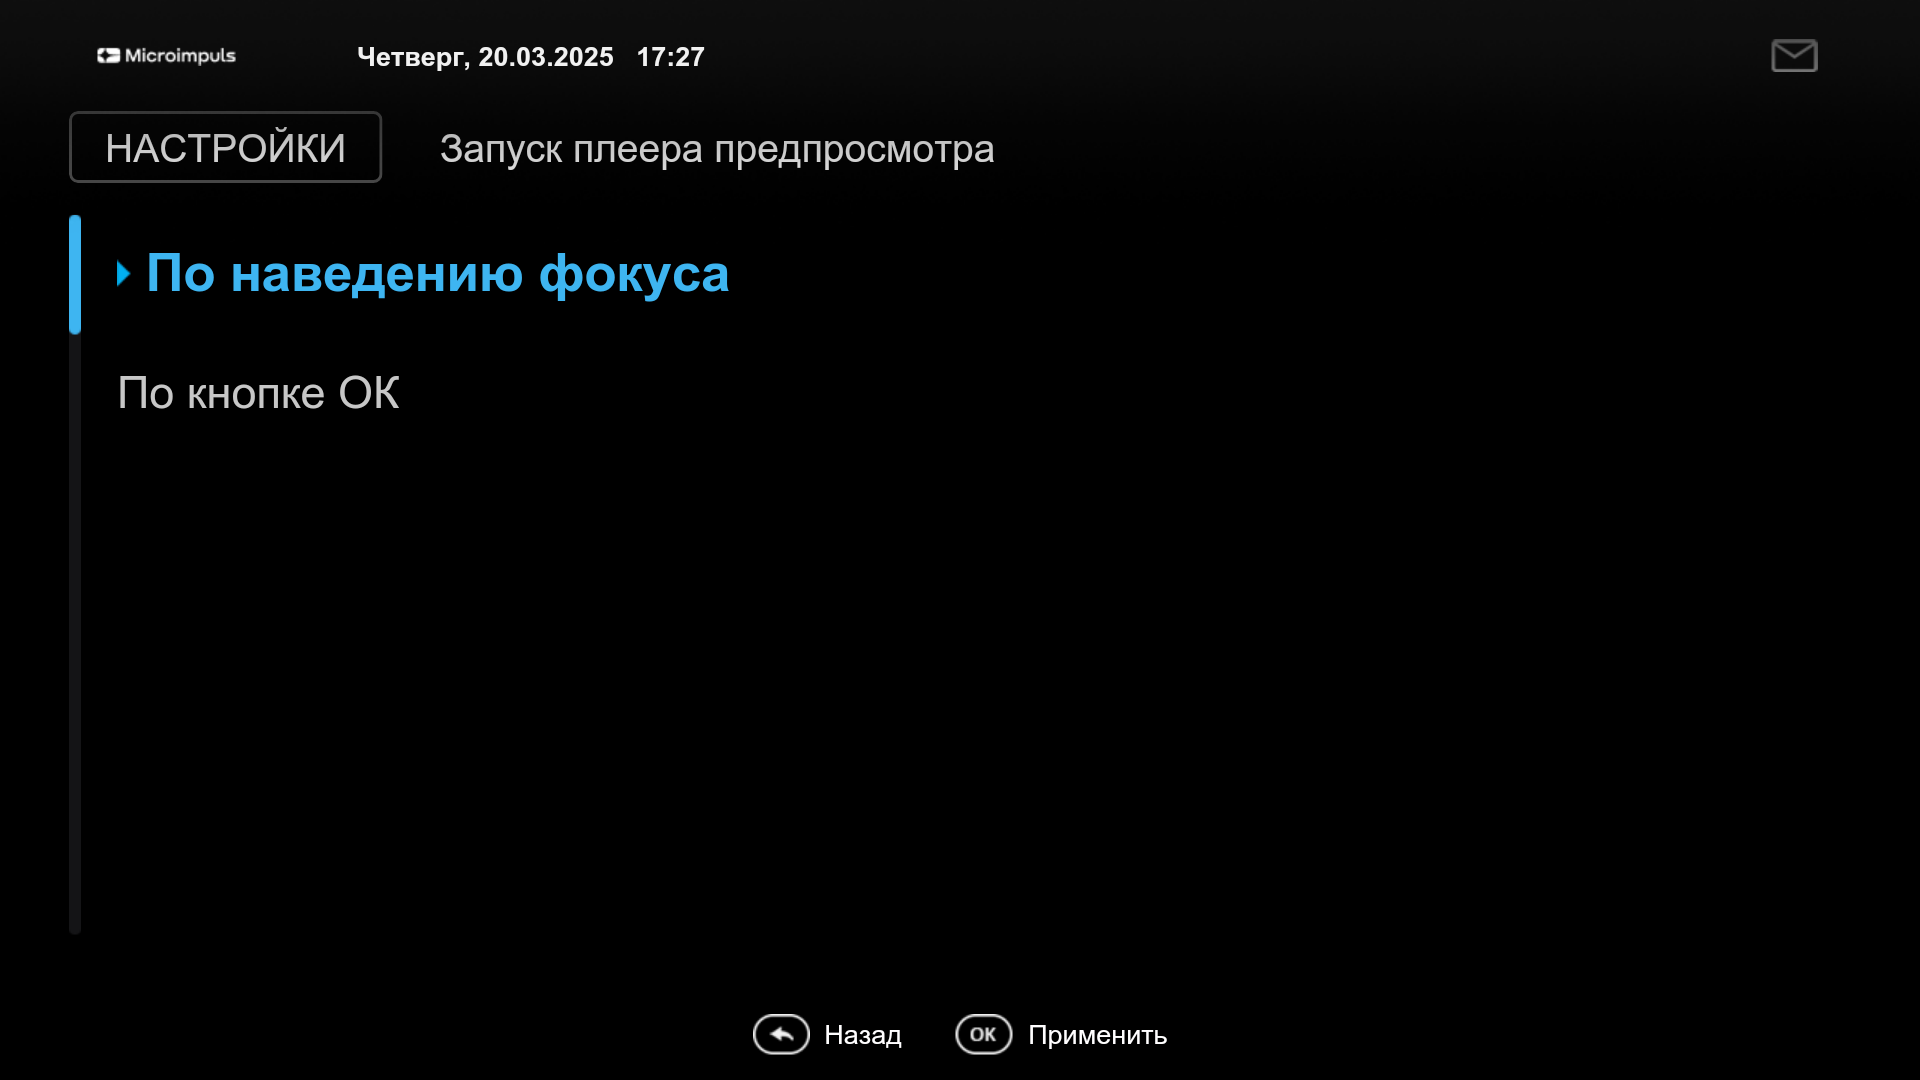
Automatic reproduction of the channel when moving the focus in preview mode
Option name: switch_channels_in_preview_mode, data type: bool.
Possible values:
- true when moving the focus in the list of channels, the selected channel will play automatically.
- falsely To play the channel, you need to press the OK button (by default).
Example:
var CLIENT_SETTINGS = {
///...
'switch_channels_in_preview_mode': false
};
Automatic playback of the last channel viewed at launch
Option name: auto_launch_last_view_channel, data type: bool.
Possible values:
- true play the last channel automatically when the application starts.
- falsely display the main screen (by default).
Example:
var CLIENT_SETTINGS = {
///...
'auto_launch_last_viewed_channel': false
};
The ability to select a data center in the settings menu
Option name: allow_to_change_data_center, data type: bool.
Possible values:
- true In the settings menu, the user can independently choose the broadcast server (corresponds to the configured data centers in Smarty).
- falsely the user will not be able to select the broadcast server (by default).
Example:
var CLIENT_SETTINGS = {
///...
'allow_to_change_data_center': false
};
Sound control mode on Samsung Smart TV Orsay
Option name: samsung_smart_tv_volume_control_off, data type: bool.
Possible values:
- true sound control is carried out at the level of the operating system of the device (standard control inside the tv).
- falsely sound management is carried out at the application level (by default).
Example:
var CLIENT_SETTINGS = {
///...
'samsung_smart_tv_volume_control_off': false
};
Volume up/down step
Option name: volume_control_step, data type: int.
By default 5 (percentage points out of 100, where 100 is the maximum volume, 0 is the minimum).
Example:
var CLIENT_SETTINGS = {
///...
'volume_control_step': 5
};
Stopping content playback when leaving full-screen viewing
Option name: stop_player_on_screen_showing, data type: bool.
Possible values:
- true when switching to other screens, the player will be stopped.
- falsely the player will work in the background, the interface will be displayed with the effect of semitransparency (by default).
Example:
var CLIENT_SETTINGS = {
///...
'top_player_on_screen_showing': false
};
Keeping the selected aspect ratio for each channel separately
Option name: save_aspect_ratio_per_channel, data type: bool.
Possible values:
- true in the application settings on the device, the aspect ratio selected by the user will be stored separately for each channel.
- falsely the last selected aspect ratio common to all channels will be retained (by default).
Example:
var CLIENT_SETTINGS = {
///...
'save_aspect_ratio_per_channel': false
};
Ignoring the aspect ratio value coming from Smarty
Option name: ignore_server_aspect, data type: bool.
Possible values:
- true Setting an aspect ratio on the channel editing page in Smarty will not affect the channel aspect ratio (by default).
- falsely The “Party Ratio” value on the channel editing page in Smarty will be taken by default for channels.
Example:
var CLIENT_SETTINGS = {
///...
'ignore_server_aspect': false
};
Save the selected audio track language for each channel separately
Option name: save_audio_track_lang_per_channel, data type: bool.
Possible values:
- true in the application settings on the device, the user selected audio track language will be stored separately for each channel.
- falsely the last selected language common to all channels will be saved (by default).
Example:
var CLIENT_SETTINGS = {
///...
'save_audio_track_lang_per_channel': false
};
Automatically Hiding Menus When Playing Content
Option name: autohide_timer, data type: int.
Allows you to set a timeout (in minutes), after which the current screen will be hidden and a full-screen player will be opened, if there is currently playback of any content.
By default 0 (hidden off).
Example:
var CLIENT_SETTINGS = {
///...
'autohide_timer': 2
};
Configure UDP Proxy on Android devices
Option name: show_udp_proxy_settings, data type: bool.
Possible values:
- true – the settings menu will display the option “UDP Proxy”, with which you can configure the Multicast-links through UDP Proxy.
- falsely - the item will be hidden (by default).
Example:
var CLIENT_SETTINGS = {
///...
'show_udp_proxy_settings': false
};
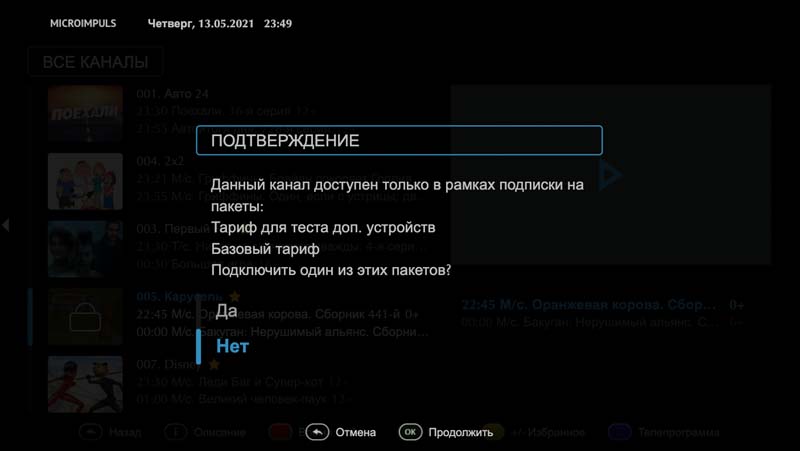
Reproduction of streams-stubs for channels with locks
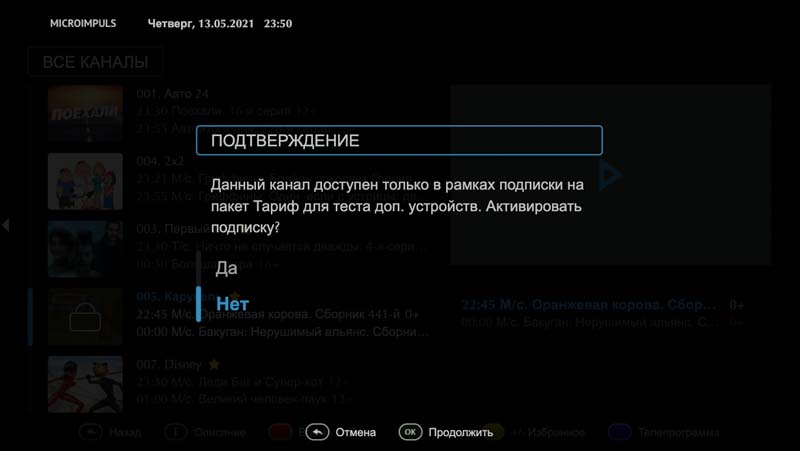
Option name: request_url_for_locked_channels, data type: bool.
Possible values:
- true - when starting the channel with a lock, an attempt is made to start a stream-stub and display a banner-stub, if the stream-stub for the channel is not set, an information pop-up is shown.
- falsely when you start the channel with locks, an information pop-up with a list of tariffs for connecting is shown (by default).
Example:
var CLIENT_SETTINGS = {
///...
'request_url_for_locked_channels': false
};
Setting a special ratio of screen sides when playing movies
Option name: set_default_aspect_ratio_for_vod, data type: bool.
Possible values:
- true after the inclusion of the playback of the film from the video library, the aspect ratio of 16×9 will be forcibly established.
- falsely - the aspect ratio selected earlier by the subscriber will be retained (by default).
Example:
var CLIENT_SETTINGS = {
///...
'set_default_aspect_ratio_for_vod': false
};
Display time of the beginning and end of the transfer in the infobar
Option name: infobar_time_display_mode, data type: string.
Allows you to change the option of displaying the time of the beginning and end of the transfer in the infobar in the archive mode or paused Live TV.
Possible values:
- by_epg time in the infobar is displayed according to the transmission program (by default).
- by_duration the start time of the transmission is set at 00:00, and the end time is set equal to the duration of the transmission.
Example:
var CLIENT_SETTINGS = {
///...
'infobar_time_display_mode': "by_epg"
};
Buying content
Restricting access to content purchases by default
Option name: default_purchase_content_access_mode, data type: string.
Possible values:
- pin By default, the mode “Payment for content with a pin code” will be selected.
- allow – by default, the mode “Pay content without a pin code” will be selected (by default).
Example:
var CLIENT_SETTINGS = {
///...
'default_purchase_content_access_mode': "allow"
};
The ability to change the restriction of access to purchases of content in the settings menu
Option name: allow_to_change_access_restriction_for_purchase_content, data type: bool.
Possible values:
- true The Settings menu will display “Access to Purchases” and the user will be able to change these restrictions (by default).
- falsely the possibility of changing the restriction of access to content purchases is prohibited.
Example:
var CLIENT_SETTINGS = {
///...
'allow_to_change_access_restriction_for_purchase_content': true
};
Appearances are common
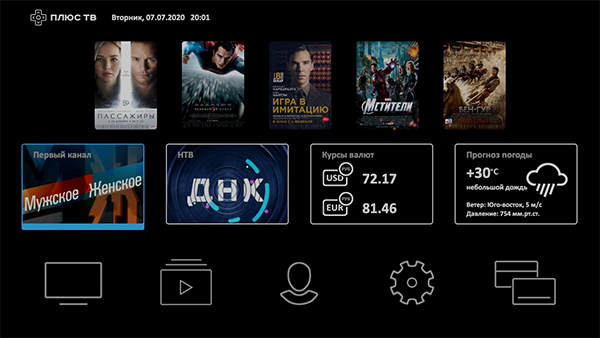
Mode of display of the main menu
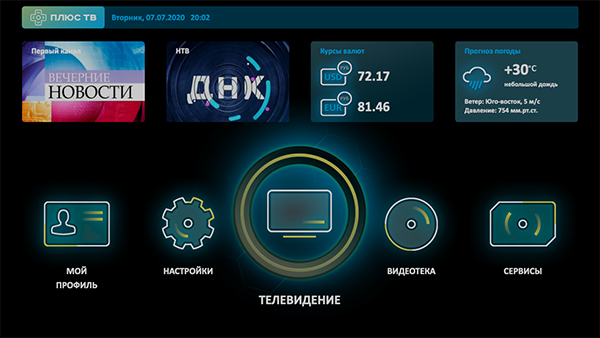
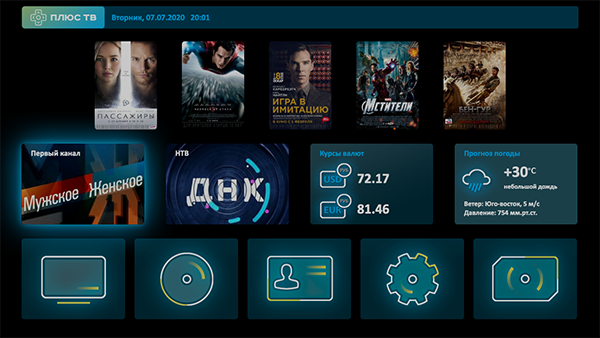
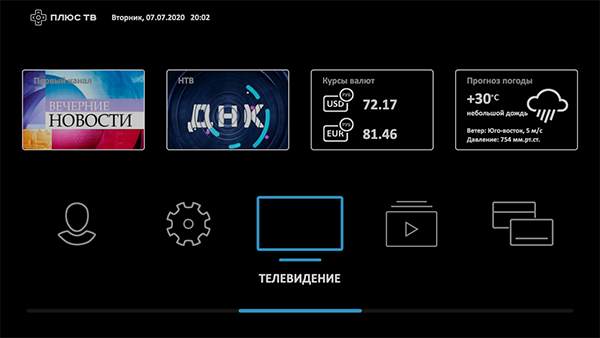
Option name: main_screen_mode, data type: string.
Possible values:
- classic - standard menu with widgets (by default).
- showcase - showcase mode with content, widgets, applications and menus.
Example:
var CLIENT_SETTINGS = {
///...
'main_screen_mode': "classic_menu"
};
Allow the user to change the display mode of the main menu on the button
Option name: allow_to_change_main_screen_mode, data type: bool.
Possible values:
- true on the screen with the main menu, the user can independently change the display mode by the yellow button of the remote.
- falsely changing the mode of display of the main menu is prohibited (by default).
Example:
var CLIENT_SETTINGS = {
///...
'allow_to_change_main_screen_mode': false
};
Display "Radio" item in the main menu
Option name: show_radio_in_main_menu, data type: bool.
Possible values:
- true The radio item will be displayed in the main menu.
- falsely - the "Radio" item will be displayed in the "Services" section (by default).
Example:
var CLIENT_SETTINGS = {
///...
'show_radio_in_main_menu': true
};
Displaying the Media Portal menu on MAG consoles
Option name: show_media_port_service_on_mag, data type: bool.
Possible values:
- true – on the “Services” screen on MAG consoles, the “Media Portal” item will be displayed, opening the built-in Infomir portal (by default).
- falsely The media portal will be hidden.
Example:
var CLIENT_SETTINGS = {
///...
'show_media_portal_service_on_mag': true
};
Displaying the Media Portal menu on DUNE consoles
Option name: show_media_port_service_on_dune, data type: bool.
Possible values:
- true – on the “Services” screen on the Dune consoles, the “Media Portal” item will be displayed, opening the built-in Dune portal (by default).
- falsely The media portal will be hidden.
Example:
var CLIENT_SETTINGS = {
///...
'show_media_portal_service_on_dune': true
};
Additional CSS class for body interface
Option name: custom, data type: string.
Allows you to connect an additional class to the body portal tag. It can be used to customize the interface through an additional CSS file.
No default.
Example:
var CLIENT_SETTINGS = {
///...
'custom_body_class': 'custom'
};
Managing the template with different remotes
Option name: remote_control_mode, data type: string.
Possible values:
- all_buttons - the template is adjusted to control the remotes with a full set of buttons (by default).
- limited_buttons The template adapts to control remotes with a limited set of buttons, as a rule, such remotes are set with modern Smart TVs and STB.
Example:
var CLIENT_SETTINGS = {
///...
'remote_control_mode': 'all_buttons'
};
Appearance - TV
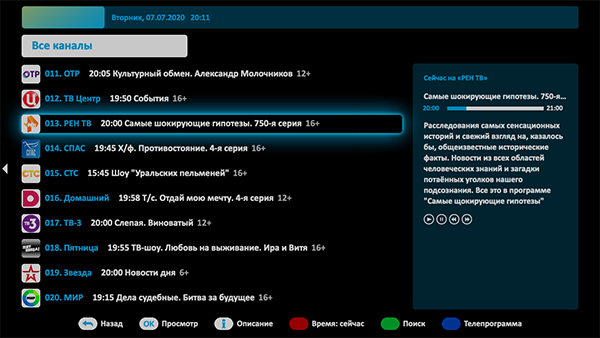
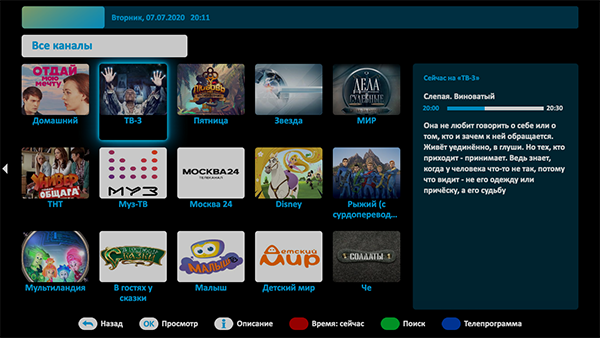
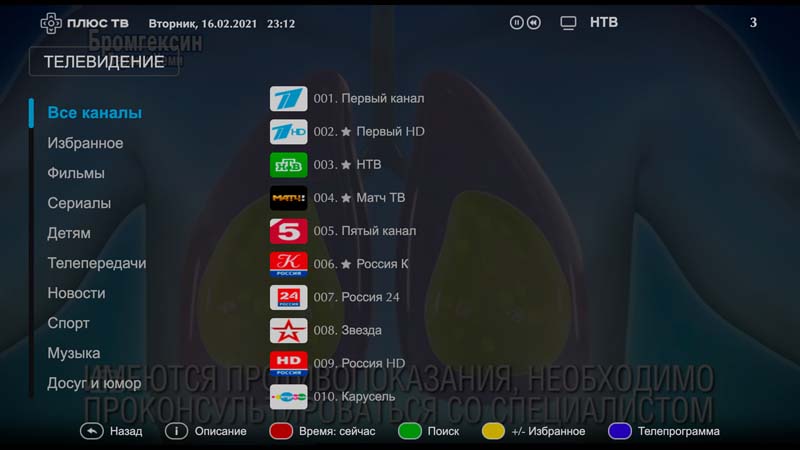
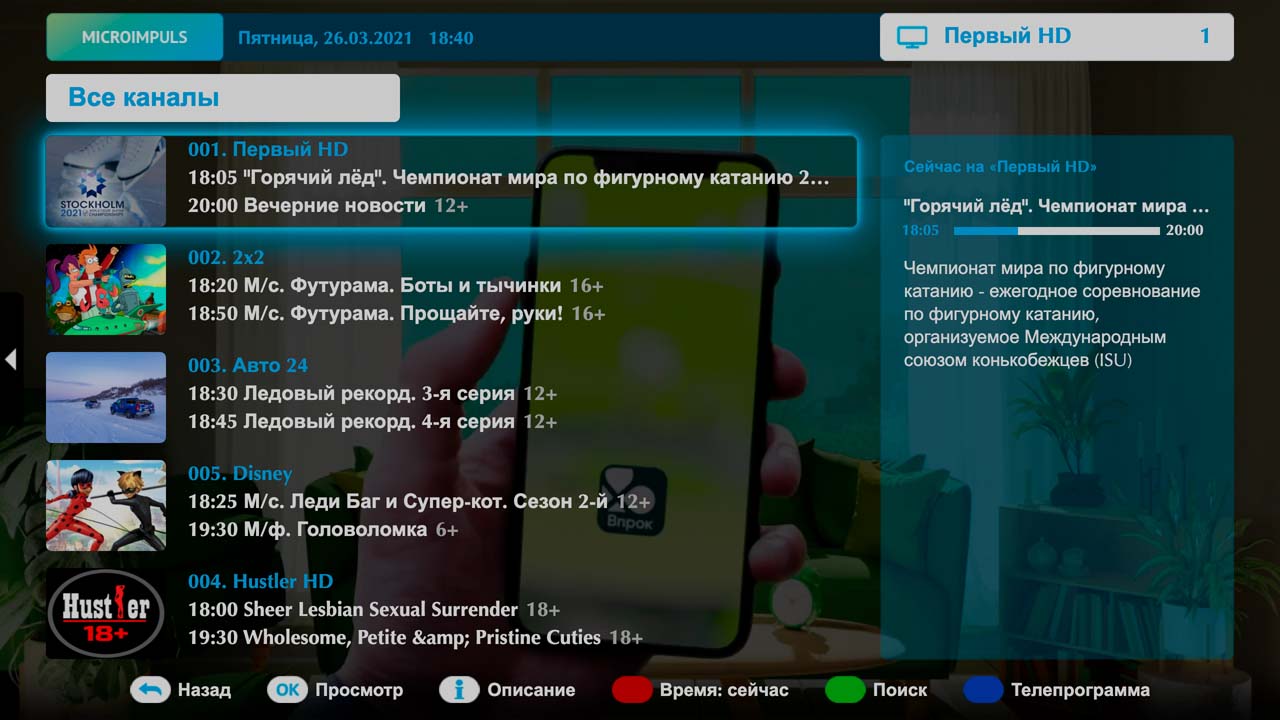
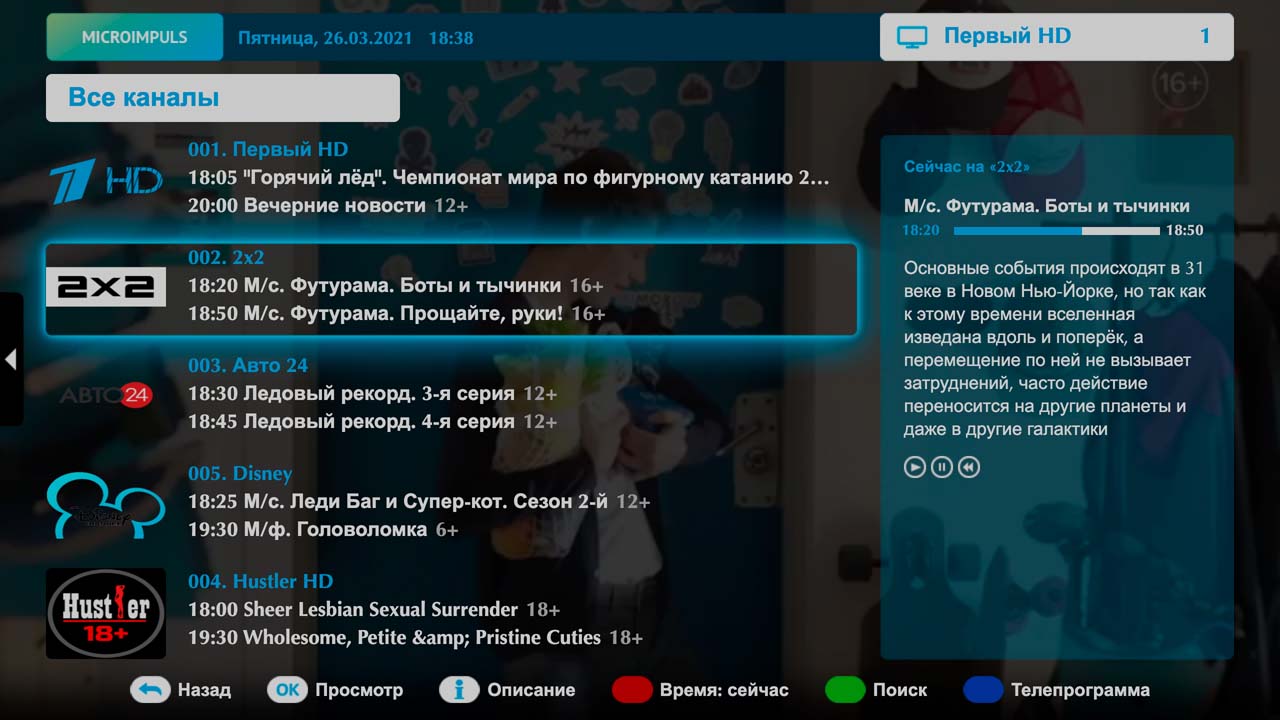
Mode of displaying the list of TV channels
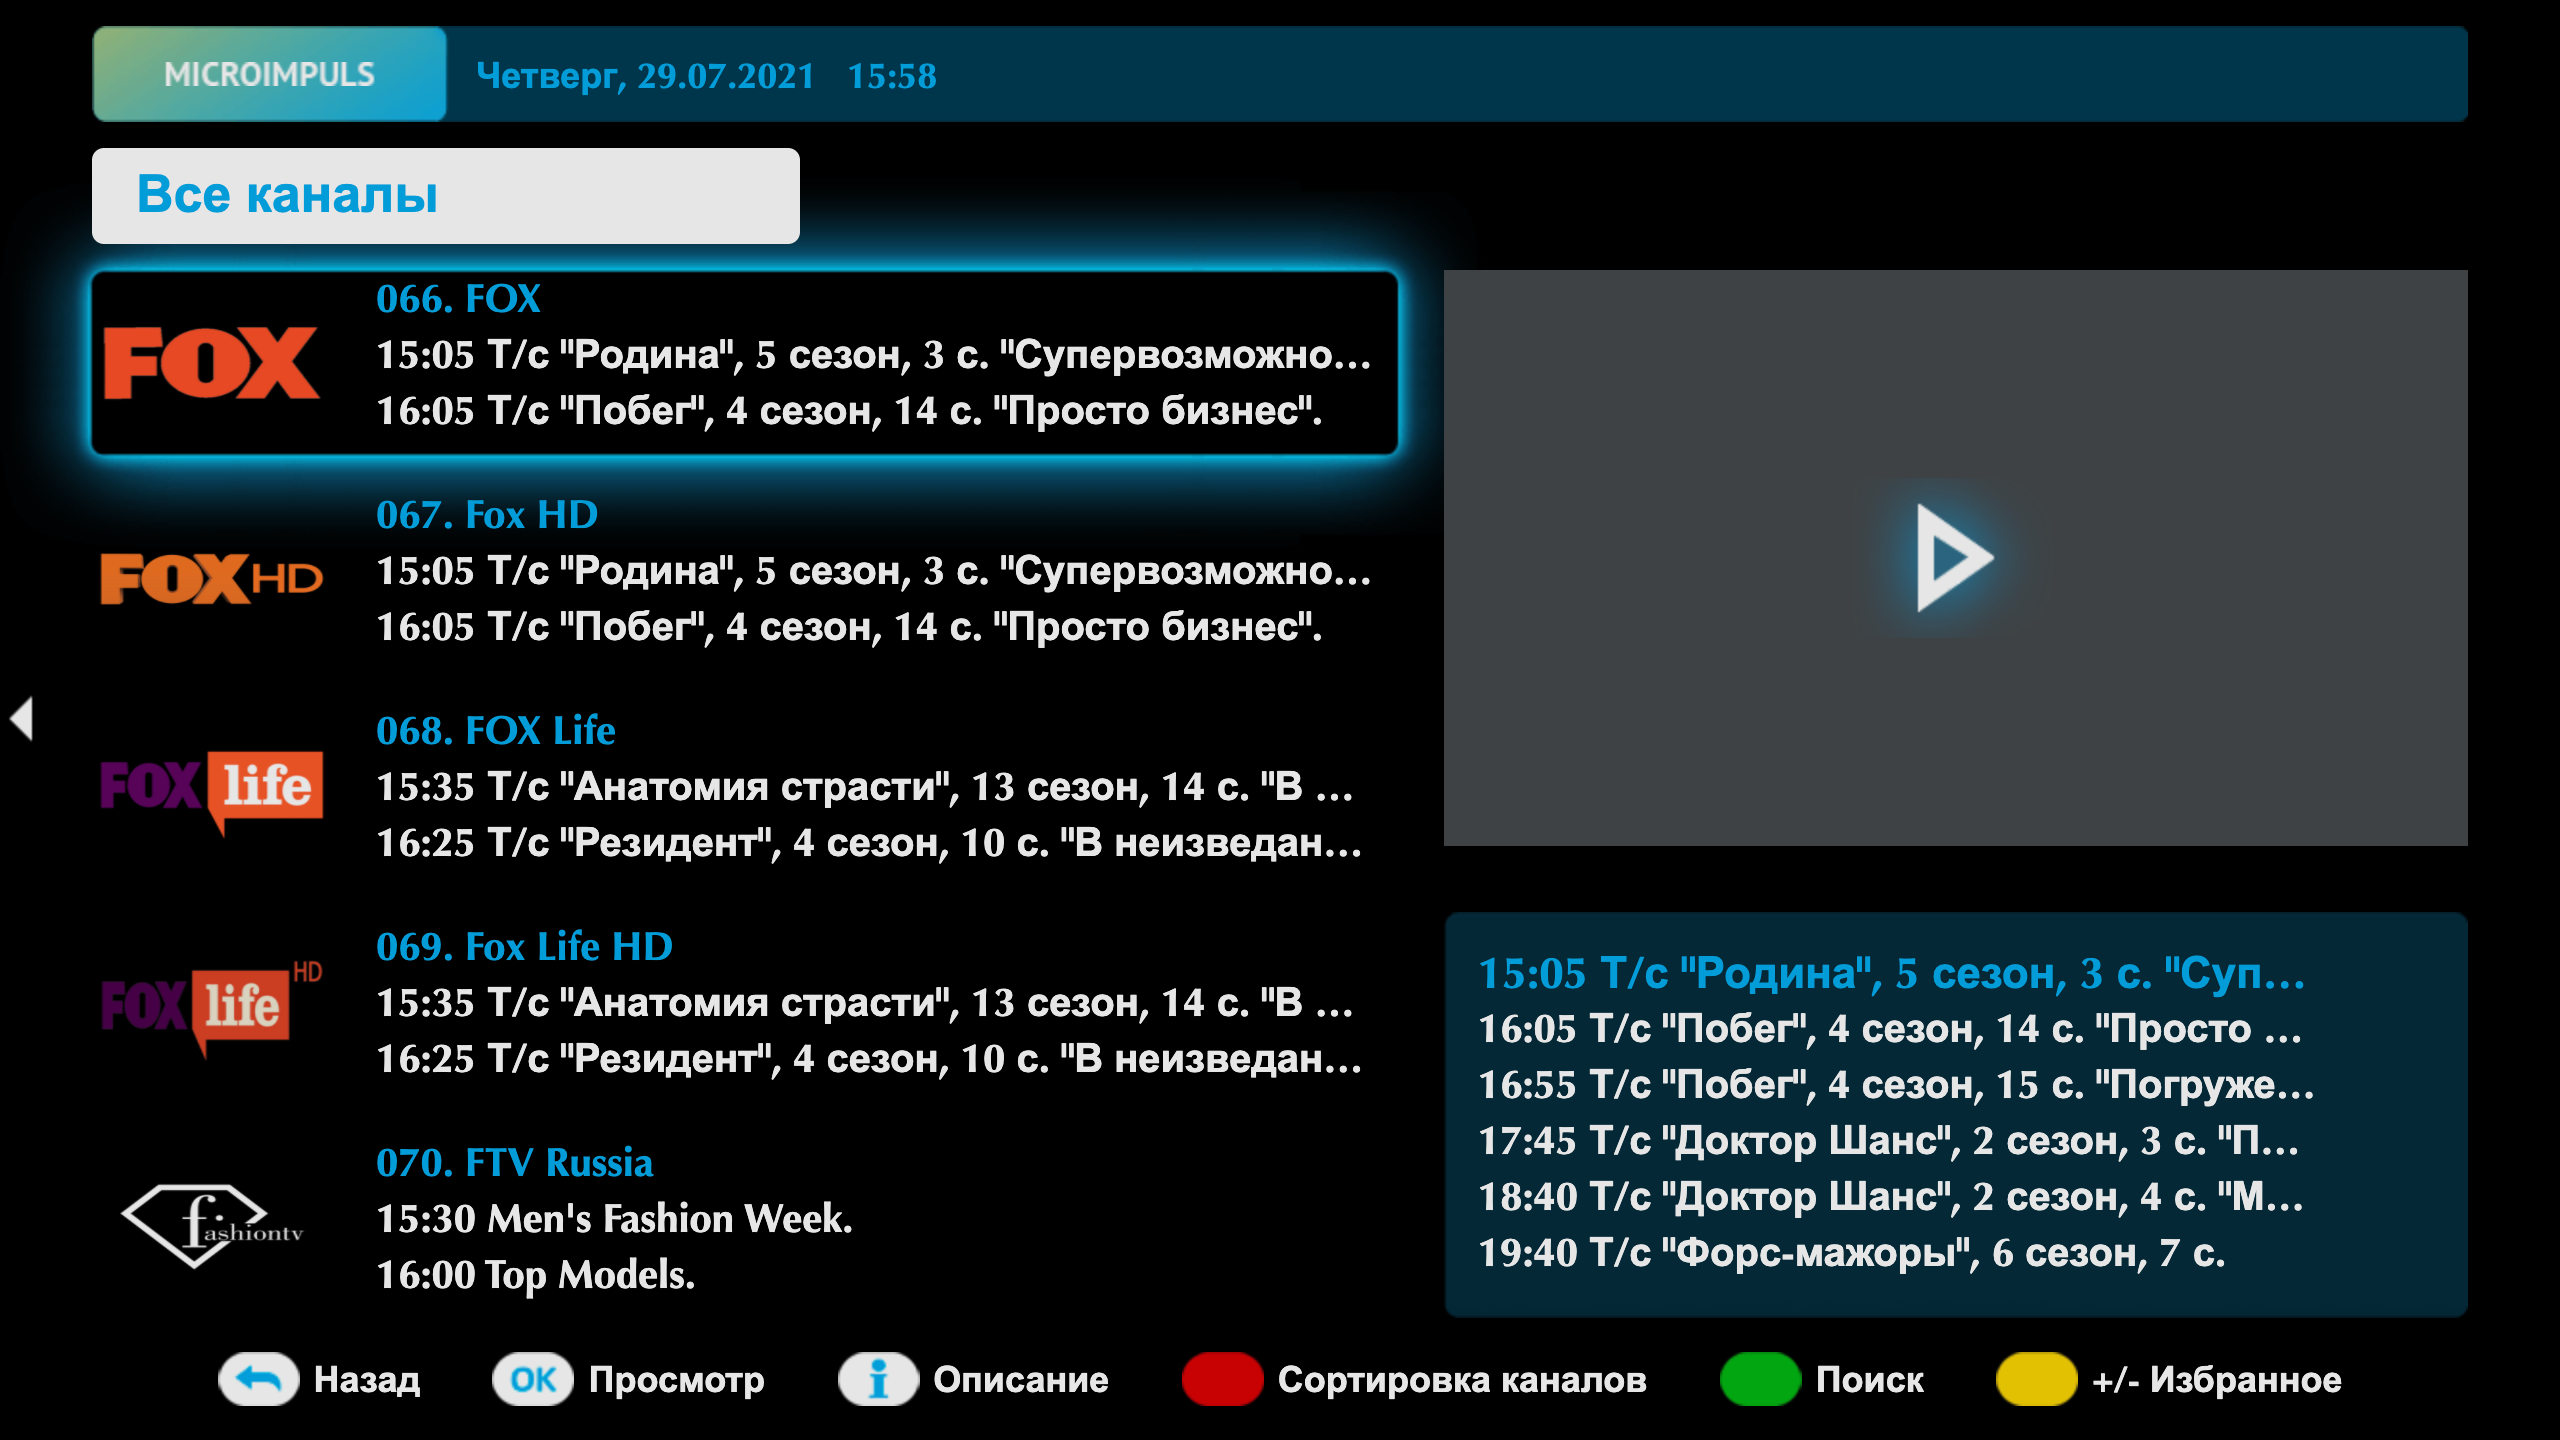
Option name: tv_channels_list_mode, data type: string.
Possible values:
- list - the usual list (by default).
- grid - tile.
- longlist a long list (10 channels per page instead of 5).
Example:
var CLIENT_SETTINGS = {
///...
'tv_channels_list_mode': "list"
};

Allow the user to change the mode of displaying channels on the button
Option name: allow_to_change_tv_channel_list_mode, data type: bool.
Possible values:
- true on the screen with the list of channels when focusing on the list with categories, the user will be able to independently change the display mode by the yellow button of the remote.
- falsely changing the mode of displaying the list of channels is prohibited (by default).
Example:
var CLIENT_SETTINGS = {
///...
'allow_to_change_tv_channels_list_mode': false
};
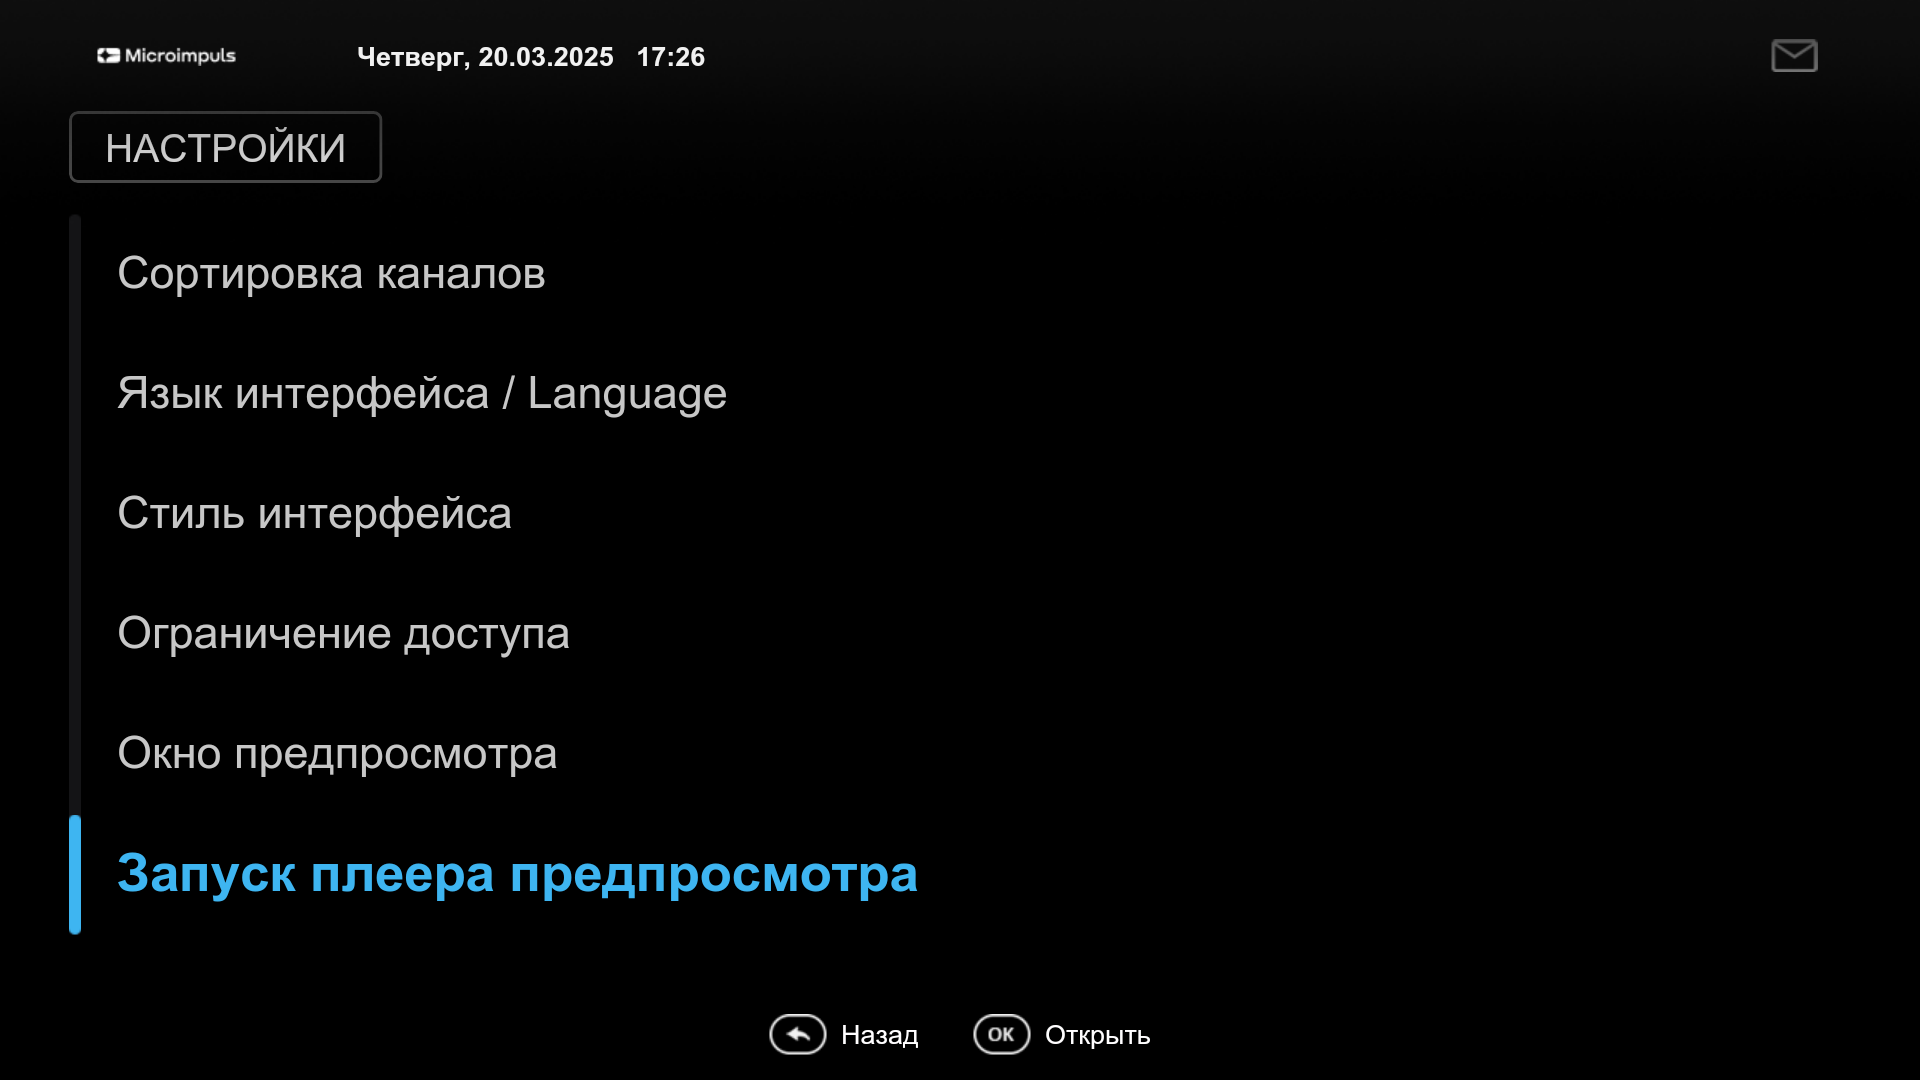
Showing the player preview window in the TV screen
Option name: default_value_for_preview_mode_setting, data type: number.
Possible values:
- 0 - preview mode is disabled by default (by default).
- 1 – the default preview mode is enabled (in the Settings screen the value “Show”).
Example:
var CLIENT_SETTINGS = {
///...
'default_value_for_preview_mode_setting': 1,
};
Display the number of channels in the category "All channels"
Option name: show_number_of_channels_in_all_category, data type: bool.
Possible values:
- true The screen with the list of channel categories in the All Channels category will show the number of channels in that category.
- falsely the number is not shown (by default).
Example:
var CLIENT_SETTINGS = {
///...
'show_number_of_channels_in_all_category': false
};
Display only their names for the list of channels in longlist mode
Option name: longlist_show_only_channel_names, data type: bool.
Possible values:
- true in the list of channels in longlist mode, only channel names will be displayed, without displaying the current transmission.
- falsely the list will show the name of the channel and the current transmission.
Example:
var CLIENT_SETTINGS = {
///...
'longlist_show_only_channel_names': false
};
'longlist_show_only_channel_names': false
'longlist_show_only_channel_names': true
Icon display mode / transmission preview for channels
Option name: tv_channels_icon_mode, data type: string.
Possible values:
- program - in the list of tv channels the preview of programs (by default) is displayed.
- icon the list of channels shows icons of channels.
Example:
var CLIENT_SETTINGS = {
///...
'tv_channels_icon_mode': "program_preview"
};
Displaying the channel icon in the program without a poster
Option name: show_channel_logo_if_empty_epg_preview, data type: bool.
Possible values:
- true if the transmission program does not have an icon, then when you turn on the option instead of the plug, the channel icon will be displayed.
- falsely - transmission programs without icons will display a stub (by default).
Example:
var CLIENT_SETTINGS = {
///...
'how_channel_logo_if_empty_epg_preview': false
};
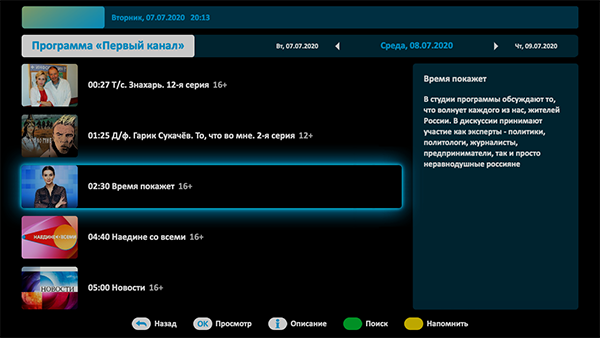
Mode of display of the TV program
Option name: epg_list_mode, data type: string.
Possible values:
- list - the default list (by default).
- longlist a long list with no additional information about each transfer.
Example:
var CLIENT_SETTINGS = {
///...
'epg_list_mode': "list"
};
Depth of TV program display
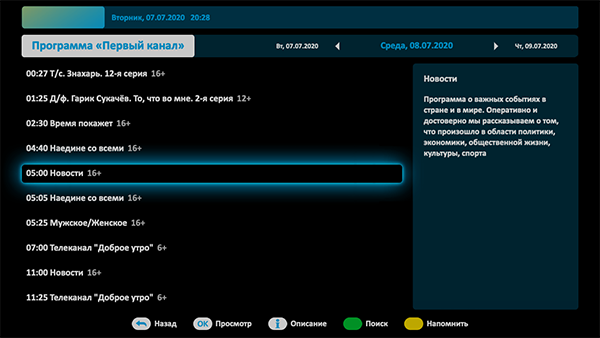
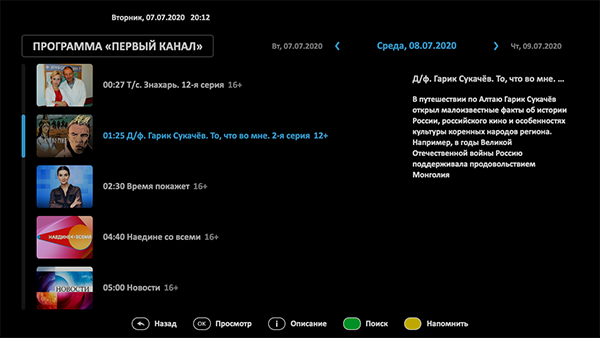
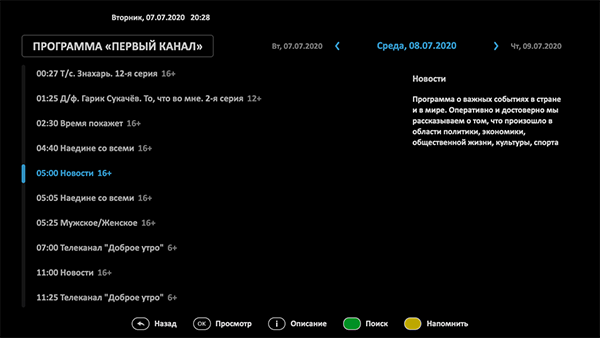
Option name: max_epg_depth, data type: int.
Determines the EPG depth in days for the TV screen. If the value of the option is greater than 0, the depth will be equal to this value. If the option is not set (or equal to 0), then the archive depth will be used for the channel with the archive max_archive_duration if the channel does not have an archive, the program will be displayed only for the current day.
By default 0.
Example:
var CLIENT_SETTINGS = {
///...
'max_epg_depth': 0
};
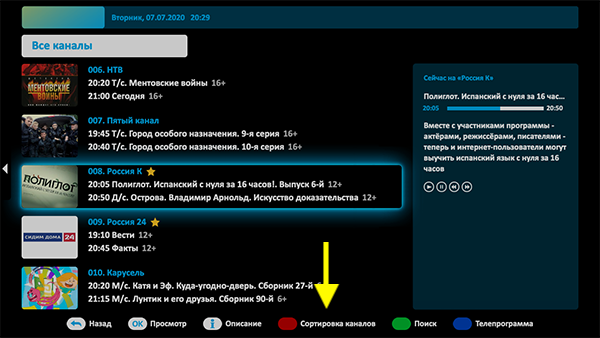
Quick transition to the screen “Sort of channels” from the list of TV channels
Option name: open_sort_from_tv, data type: bool.
Possible values:
- true when you press the red button in the list of channels will open screen sorting channels.
- falsely the behavior of the red button by default (by default).
Example:
var CLIENT_SETTINGS = {
///...
'open_sort_from_tv': false
};
Hiding the Zero Rating of TV Programs
Option name: epg_hide_zero_plus_rating, data type: bool.
Possible values:
- true the 0+ rating will be hidden (only for the visual display of the ranking itself, not the content).
- falsely the 0+ rating will be displayed (by default).
Example:
var CLIENT_SETTINGS = {
///...
'epg_hide_zero_plus_rating': false
};
Display category "Favorites" for TV channels
Option name: tv_how_favorites, data type: bool.
Possible values:
- true The list of channels will display the category “Favorites” and the user has the opportunity to add channels to their favorites.
- falsely the function will be disabled (by default).
Example:
var CLIENT_SETTINGS = {
///...
'tv_show_favorites': false
};
Number of future transmissions displayed for a dedicated channel
The number of future transmissions displayed for a dedicated channel is affected by 2 options:
request_next_program_limitdata type: int (by default: 0).request_next_programs_minimum_thresholddata type: int (by default: 2).
In order to reduce the load on the server by default, an indefinite number of transmissions is displayed under the preview player for the channel depending on their EPG duration (the shorter the transmission, the more there are, but at least 2). Option request_next_program_limit sets the number of requested next transmissions for the EPG channel, including the current one. Option request_next_programs_minimum_threshold in turn, determines the minimum number of transmissions that are required to display TV channels under the preview player. Thus, choosing the right combination of these options, you can fix the number of programs displayed in the TV screen and maintain an acceptable level of load on the server. For example:
var CLIENT_SETTINGS = {
///...
'request_next_programs_minimum_threshold': 6, // required number of transmissions to display
'request_next_programs_limit': 12, // the number of transmissions requested from the server, the difference with the value of the previous field allows you to smooth the load on the server and send requests with a lower frequency
};
Request randomization interval for EPG update
Option name: expired_programs_update_interval_randomization, data type: int.
By default: 55000 (55 seconds).
The option allows you to set the interval for randomizing the EPG request. The load on the server is “smeared” in time within this interval, which ensures that after the transfer is over, all active devices do not send a request for an update at the same time. The flip side of this optimization is that after becoming obsolete, the program will not be updated instantly, but with a possible delay of 5 to 55 seconds, so if this delay is critical, it is possible to reduce this interval or remove it altogether (while increasing the load on the server).
Example:
var CLIENT_SETTINGS = {
///...
'expired_programs_update_interval_randomization': 55,000,
};
Appearance - video library
Video library display mode
Option name: vod_mode, data type: string.
Possible values:
- classic - display of the video library by default (by default).
Example:
var CLIENT_SETTINGS = {
///...
'vod_mode': 'classic'
};
Mode of displaying the list of films in the video library
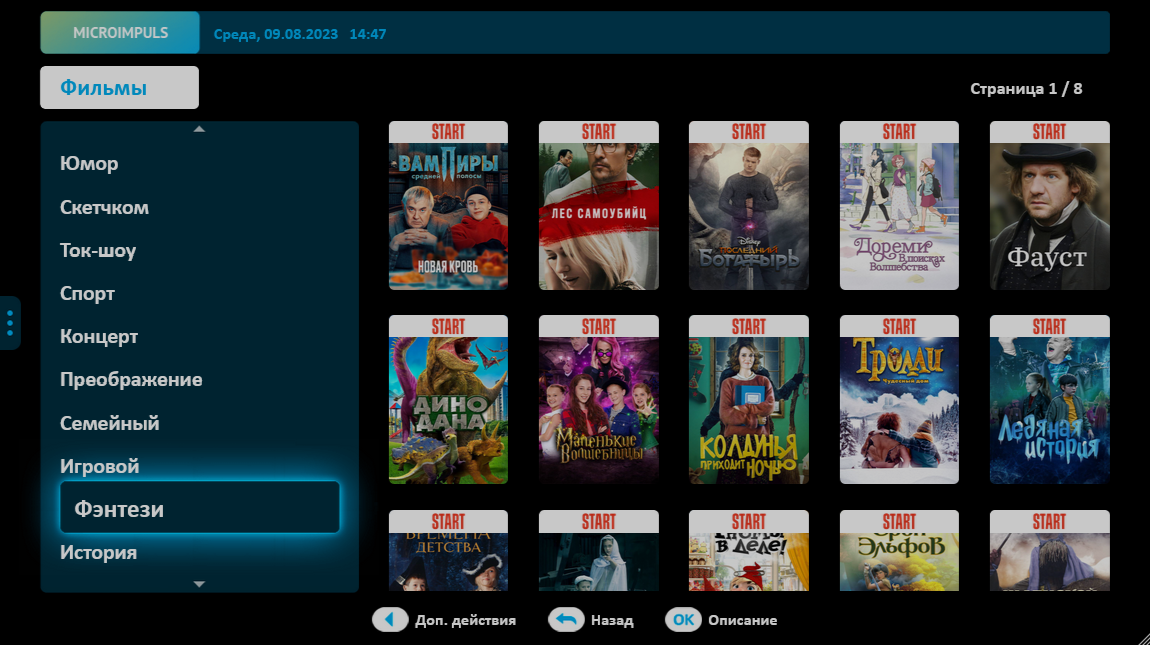
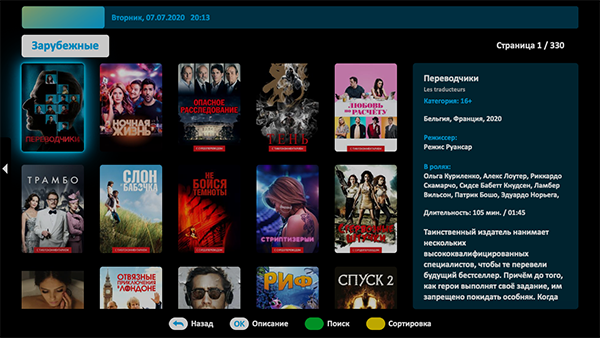
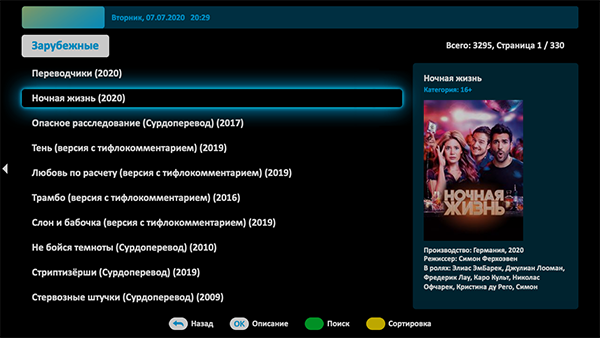
Option name: vod_list_mode, data type: string.
Possible values:
- grid - standard display of tiles (by default).
- longlist a long list of films without posters.
Example:
var CLIENT_SETTINGS = {
///...
'vod_list_mode': "grid"
};
Display of category "News" in the video library
Option name: vod_show_news, data type: bool.
Possible values:
- true - display the category "New" (by default).
- falsely - not display.
Example:
var CLIENT_SETTINGS = {
///...
'vod_show_news': false
};
Display category "All films" in the video library
Option name: vod_show_all, data type: bool.
Possible values:
- true The list of categories of films will display the category “Everything”.
- falsely The “all” category will be hidden (by default).
Example:
var CLIENT_SETTINGS = {
///...
'vod_show_all': false
};
Display category "Film Packages" in the video library
Option name: vod_show_packages, data type: bool.
Possible values:
- true The list of categories in the video library will show the category “Movie Packages” with movie packages configured in Smarty as packages (by default).
- falsely - the category will be hidden.
Example:
var CLIENT_SETTINGS = {
///...
'vod_show_packages': true
};
Display category "Buyed" in the video library
Option name: vod_show_purchased, data type: bool.
Possible values:
- true In the list of categories in the video library, the category “Buyed” will be shown, containing purchased films (within rent or subscription).
- falsely the category will be hidden (by default).
Example:
var CLIENT_SETTINGS = {
///...
'vod_show_purchased': false
};
Display category "Viewed" in the video library
Option name: vod_show_viewed, data type: bool.
Possible values:
- true In the list of categories in the video library will be shown the category "Viewed", containing watched and under-viewed films.
- falsely the category will be hidden (by default).
Example:
var CLIENT_SETTINGS = {
///...
'vod_show_viewed': false
};
Display category "Favorites" in the video library
Option name: vod_show_favorited, data type: bool.
Possible values:
- true In the list of categories in the video library will be shown the category "Favorites" and the user has the opportunity to add movies to their favorites.
- falsely the function will be disabled (by default).
Example:
var CLIENT_SETTINGS = {
///...
'vod_show_favorited': false
};
Display in the video library of films, the source of which is archival records
Option name: show_archive_in_vod_screen, data type: bool. To fill the video library with archival records, you need to use instruction. To work correctly, you will need posters 2:3 for archival films.
Possible values:
- true when a video list is requested, films from archival records will be transmitted.
- falsely when you request a video list, you will not transfer movies from archive records (by default).
Example:
var CLIENT_SETTINGS = {
  // ..
  'show_archive_in_vod_screen': false
};
Grouping of films by category or genre
Option name: filter_videos_by_genres, data type: bool.
Possible values:
- true movies will be grouped by genre (by default).
- falsely Films will be grouped into categories (genres in Smarty with the option “Is a Category” enabled).
Example:
var CLIENT_SETTINGS = {
///...
'filter_videos_by_genres': true
};
Displaying an intermediate screen with a list of cinemas
Option name: show_screen_with_choice_of_cinema, data type: bool.
Possible values:
- true - when you open the "Video library" section, an intermediate screen for selecting a cinema will be shown if there are several sources of VOD (PREMIER, START, etc.), when you click on any of them, a list of films belonging only to the selected cinema will be displayed.
- falsely When you open the "Video" section, a general list of films will immediately open without separation into sources (by default).
Example:
var CLIENT_SETTINGS = {
///...
'filter_videos_by_genres': true
};
How to sort movies by default
Option name: default_vod_sort_order, data type: string.
Possible values:
- - created_at - by the date of addition (first the newest) (by default).
- -kinopoisk_rating - according to the rating of Kinopoisk (first the most popular).
- -imdb_rating According to IMDB rating (first most popular).
- -year the year the film was released (the newest first).
- -premiere_date the release date of the film (the newest first).
- name by name (in alphabetical order).
- -updated_at - on the date of change of the film, first the newest (sort is updated after resetting the cache).
Example:
var CLIENT_SETTINGS = {
///...
'default_vod_sort_order': "-created_at"
};
Disabling the display of empty genres
Option name: vod_without_empty_genres, data type: bool.
Possible values:
- true The video screen will not display genres that no film corresponds to. The exceptions are the Favorites, Novelties and Viewed categories – they will be displayed if the relevant options are enabled and even if they are empty.
- falsely The video screen will display all genres created in the Smarty administrative panel (by default).
Example:
var CLIENT_SETTINGS = {
///...
-vod_without_empty_genres': true
};
Disabling the screening of actors on the film page
Option name: show_actors, data type: bool.
Possible values:
- true In the screen "Film Description" will be displayed tape with photos of actors with the ability to open for each actor page with his description (by default).
- falsely In the screen "Film Description" will not display a tape with photos of actors.
Example:
var CLIENT_SETTINGS = {
///...
-show_actors
Sorting the list of actors on the film page
Option name: actorsdata type string.
Possible values:
- birthdate sorting by date of birth, from older to younger.
- birthdate sorting by date of birth, from younger to older.
- name sorting by name, in alphabetical order (by default).
- -name sorting by name, in reverse alphabetical order.
- cyrillic-first sorting by name, first come actors with cyrillic.
- film sorting actors by the number of films with their participation, in ascending order (from the actor with the least number of films to the actor with the most films).
- -film_count - sorting of actors, by the number of films with their participation, in descending order.
Example:
var CLIENT_SETTINGS = {
///...
-actors'name'
};
Limiting the number of actors on the film page
Option name: actors_request_limitdata type int. Default value: 16.
Example:
var CLIENT_SETTINGS = {
///...
-actors_request_limit': 16
};
Display seasons of series on the film page
Option name: use_content_seasons_screendata type bool.
Possible values:
- true - a new film description page is used, which reflects the seasons of the series.
- falsely the classic film description page is used (by default).
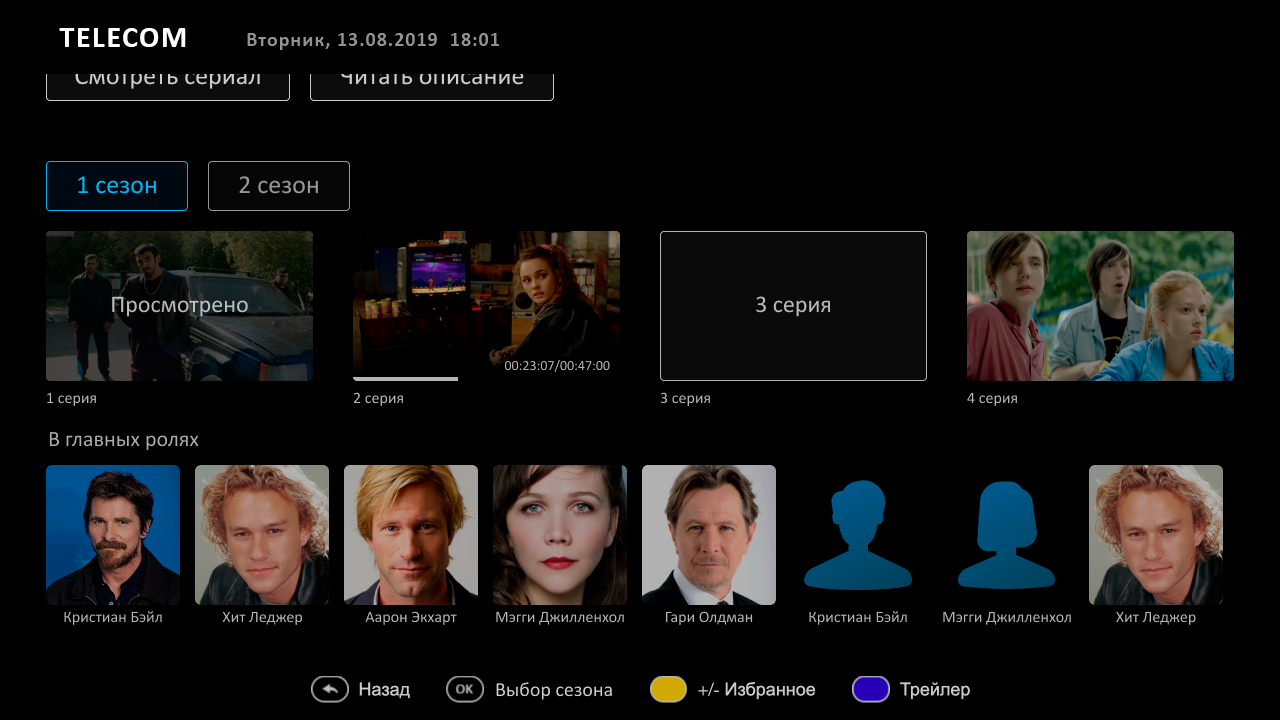
Example:
var CLIENT_SETTINGS = {
///...
-use_content_seasons_screen
Appearance - archive
Display of category "All" in the archive
Option name: archive_how_all, data type: bool.
Possible values:
- true In the list of categories of records will display the category “All” (by default).
- falsely The “Everything” category will be hidden.
Example:
var CLIENT_SETTINGS = {
///...
'archive_show_all': false
};
Grouping of records by category or genre
Option name: filter_archive_by, data type: string.
Possible values:
categories
- categories entries will be grouped by program categories (Program categories objects in Smarty Django panel), the default value.
- genres Films will be grouped by genres of programs (Program genres objects in Django-panel Smarty).
Example:
var CLIENT_SETTINGS = {
///...
'filter_archive_by': 'categories'
};
Appearance - settings
Managing the display of the item "Sorting channels" in the screen "Settings"
Option name: show_sort_screen, data type: bool.
Possible values:
- true – on the “Settings” page inside the application, the “Sorting channels” item will be displayed.
- falsely - the item "Sorting channels" on the settings page will be hidden (by default).
Example:
var CLIENT_SETTINGS = {
///...
-<meta charset="utf-8"show_sort_screen': true
};

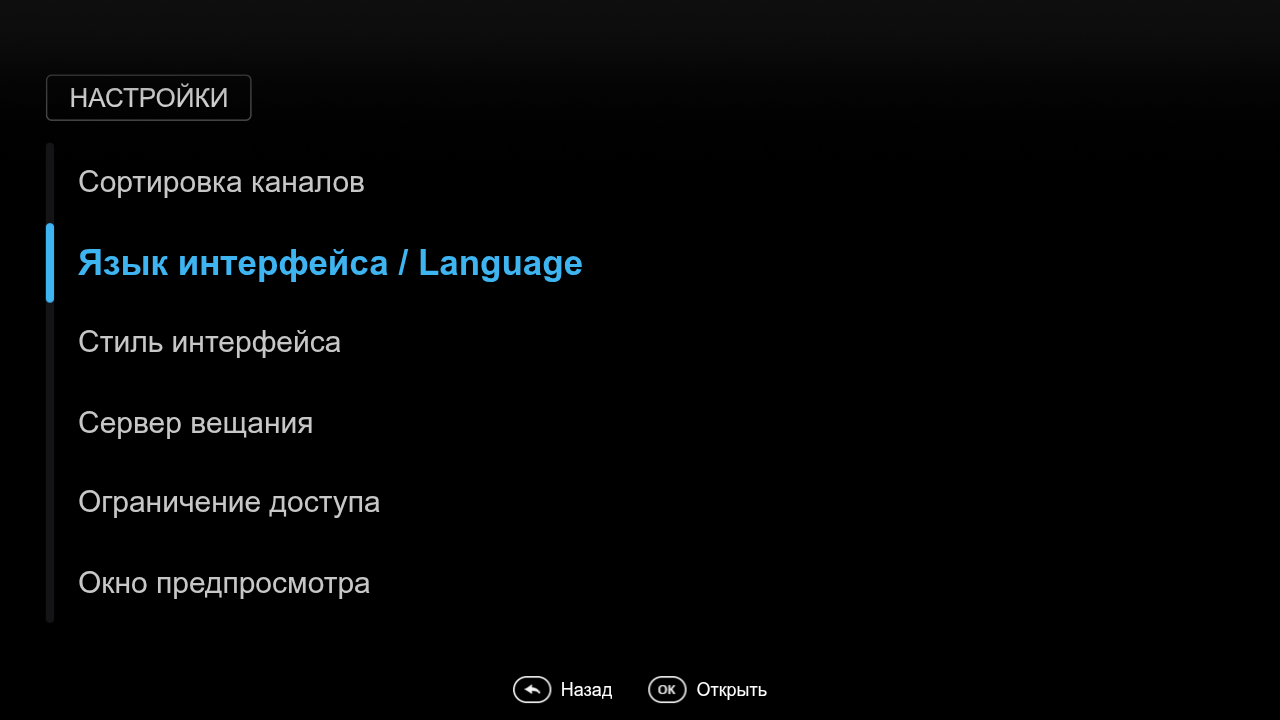
Ability to change the interface language
Option name: show_change_lang_settings, data type: bool.
Possible values:
- true – on the “Settings” page in the application, the “UI Language / Language” option will be displayed (by default).
- falsely - the item "UI Language / Language" on the settings screen will be hidden.
Example:
var CLIENT_SETTINGS = {
///...
'show_change_lang_settings': true
};
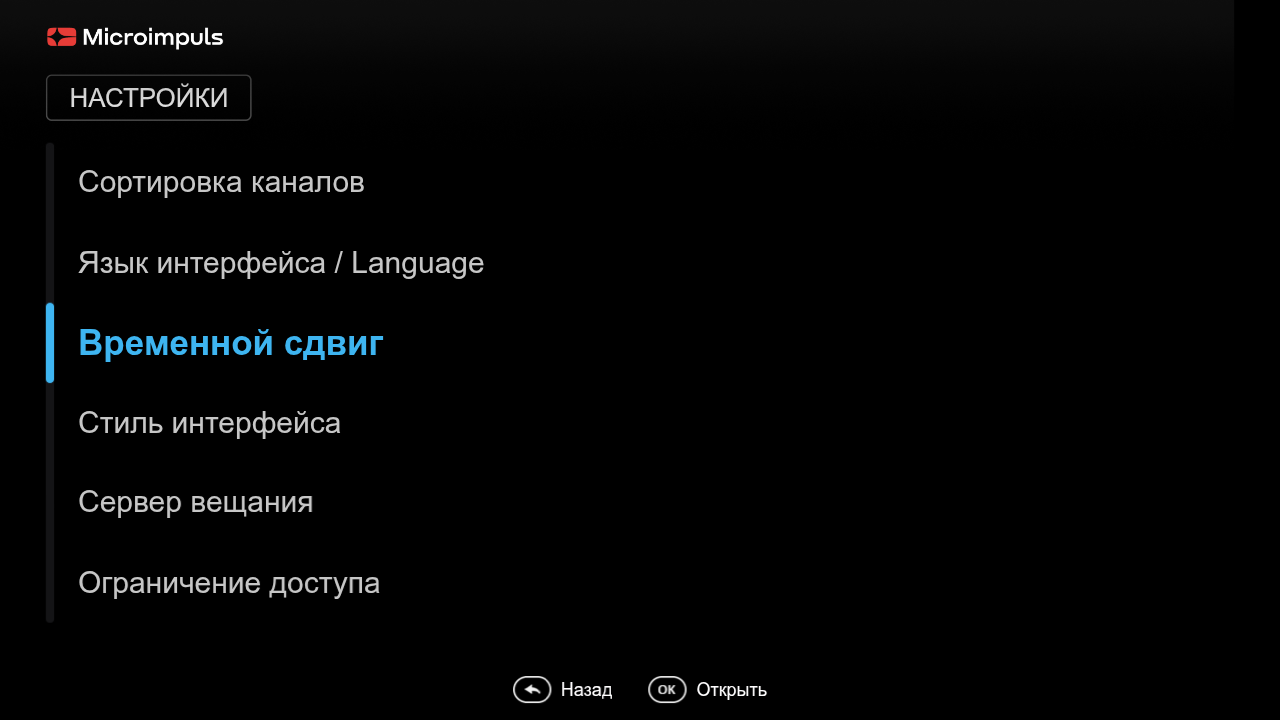
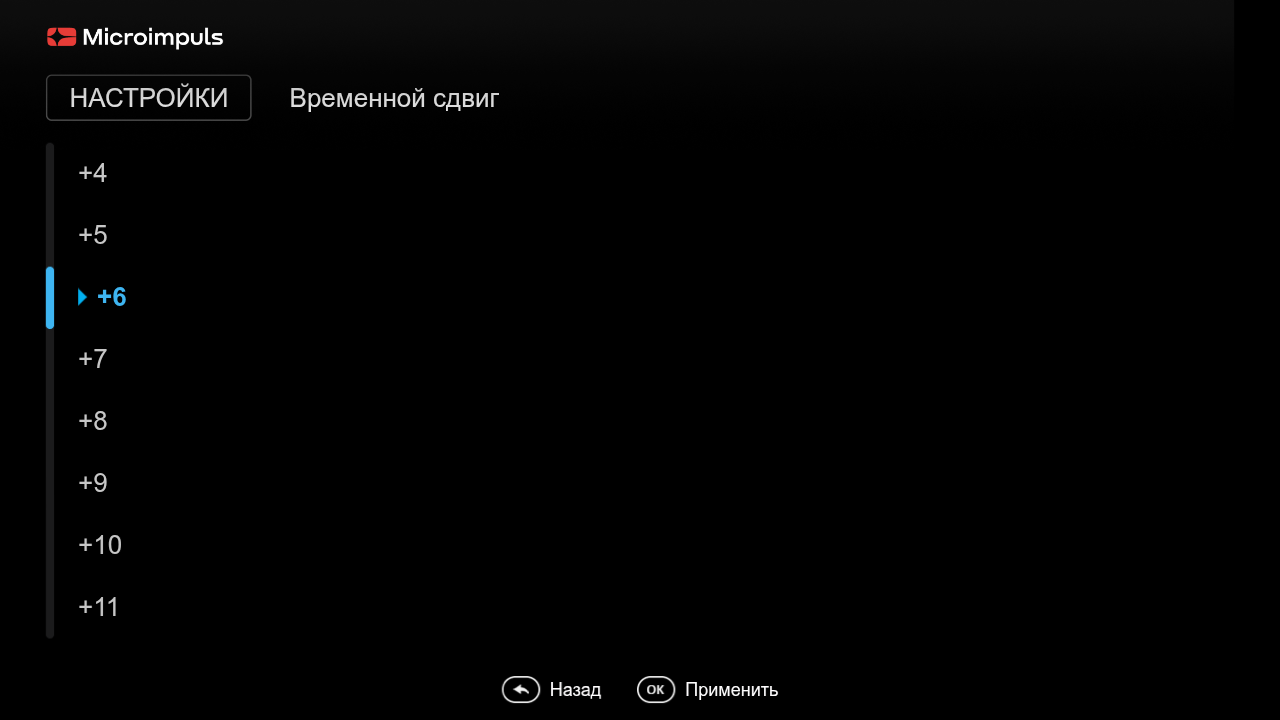
Possibility of changing the time shift in “Settings”
Option name: show_change_timezone_setting, data type: bool.
Possible values:
- true - on the Settings page in the application, the Temporary Shift item will be displayed with the user setting of the portal time zone.
- falsely The “Temporary Shift” item on the settings screen will be hidden (by default).
If the option is enabled, then in the “Time Shift” by default, a shift equal to default (ignoring the time zone of the device).
Example:
var CLIENT_SETTINGS = {
  // ..
  'show_change_timezone_setting': true
};
Custom setting of channel autoplay when moving focus in preview mode
Option name: show_preview_mode_channels_navigation_setting, data type: bool.
Possible values:
- true - on the Settings page inside the application, a paragraph with the user setting of the channel autostart will be displayed.
- falsely - the item will be hidden (by default).
Example:
var CLIENT_SETTINGS = {
  // ..
  'how_preview_mode_channels_navigation_setting': false
};
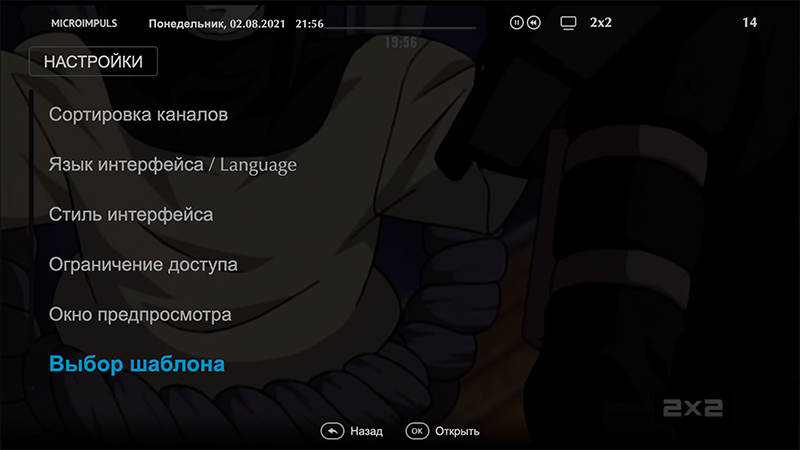
Selection of the interface used on the Settings page
Option name: show_change_template_settings, data type: bool.
Possible values:
- true – on the “Settings” page inside the application, the “Selection of a template” item will be displayed. The list of templates for selection will be formed from the array prescribed in the option
available_templates. - falsely - the item "Select the template" on the settings page will be hidden (by default).
Example:
var CLIENT_SETTINGS = {
///...
-show_change_template_settings': true
};
Managing the display item "Player Selection" in the "Settings" screen
Option name: show_change_player_settings, data type: bool.
Possible values:
- true on the “Settings” page inside the application, the “Select Player” option will be displayed for those devices that support it (currently these are Android devices under the build version above 2.0).
- falsely - the item "Select player" on the settings page will be hidden (by default).
Example:
var CLIENT_SETTINGS = {
///...
'show_change_player_settings': true
};
Appearance is my profile
Displaying the Balance menu
Option name: show_balance_menu, data type: bool.
Possible values:
- true The “My Profile” screen will display the “Balance” option (by default).
- falsely The balance item will be hidden.
Example:
var CLIENT_SETTINGS = {
///...
'show_balance_menu': true
};
Displaying the Messages menu
Option name: show_messages_menu, data type: bool.
Possible values:
- true In the screen “My profile” will display the item “Messages” (by default).
- falsely - the item "Messages" will be hidden.
Example:
var CLIENT_SETTINGS = {
///...
'show_messages_menu': true
};
Displaying the "Package Management" menu
Option name: show_packages, data type: bool.
Possible values:
- true - in the screen "My profile" will display the menu item "Package management" for the ability to connect / disable tariff packages.
- falsely The “Package Management” menu will be hidden (by default).
Example:
var CLIENT_SETTINGS = {
///...
'show_packages': false
};
Displaying the tariff price taking into account discounts
Option name: show_tariff_price_after_activation, data type: bool.
Possible values:
- true In the “Package Management” menu of the “My Profile” screen, the tariff price will be displayed taking into account possible factors that could have changed the original price (discount from the promotional code, offset deactivation date, etc.).
- falsely For the “Price” field, the cost of extending this tariff will be used (by default).
Example:
var CLIENT_SETTINGS = {
///...
'how_tariff_price_after_activation': false
};
Connecting the tariff for the channel with a lock without opening the tariff list
Option name: skip_lock_channel_package_list_and_assign_first_package, data type: bool.
Possible values:
- true when starting a channel with a lock, the list of tariffs within which this channel is available is not shown, but an automatic attempt to connect the first of them occurs.
- falsely when you start a channel with a lock, a list of tariffs is shown within which this channel is available (by default).
Example:
var CLIENT_SETTINGS = {
///...
'skip_lock_channel_package_list_and_assign_first_package': false
};
Virtual tariff management
Option name: use_virtual_packages, data type: bool.
Possible values:
- true The “My Profile” – “Package Management” screen will display virtual packages, not regular ones.
- falsely The Package Management menu will display normal packages (by default).
Example:
var CLIENT_SETTINGS = {
///...
'use_virtual_packages': false
};
Displaying the "Legal Documents" menu
Option name: show_legal_documents, data type: bool.
Possible values:
- true The “My Profile” screen will display the “Legal Documents” menu item for viewing their content and acceptance.
- falsely The “Legal Documents” menu will be hidden (by default).
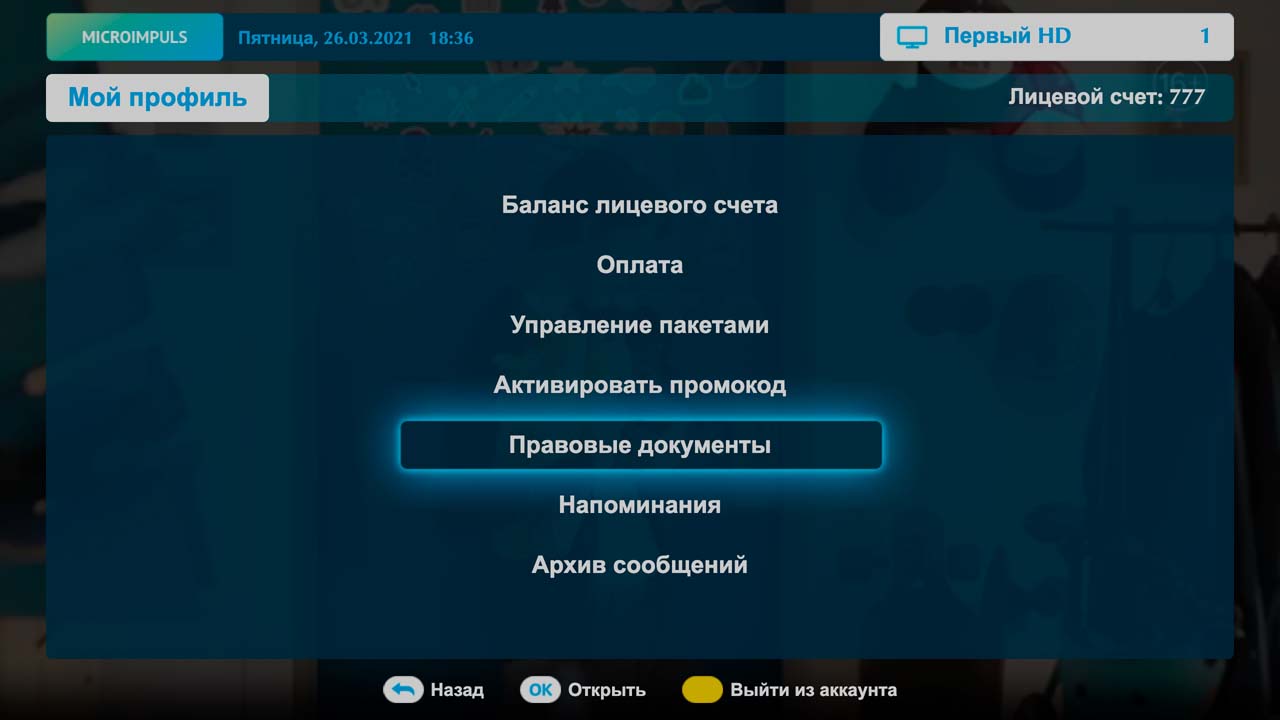

Example:
var CLIENT_SETTINGS = {
///...
'show_legal_documents': false
};
Proposal for acceptance of legal documents after successful authorization
Option name: accept_legal_documents_after_successfull_login, data type: bool.
Possible values:
- true After successful authorization of the subscriber, legal documents with the “Show at Authorization” type will be shown if there is at least one unaccepted document with the “Necessity of Acceptance” checkbox installed.
- falsely after successful authorization, the list of documents will not be shown (by default).
Example:
var CLIENT_SETTINGS = {
///...
'accept_legal_documents_after_successfull_login': false
};
Acceptance of legal documents without confirmation
Option name: accept_legal_document_without_confirm_, data type: bool.
Possible values:
- true the legal document is accepted in one click without showing a pop-up window with a request to confirm the action.
- falsely when accepting the document, a pop-up window is shown with a request to confirm the action (by default).
Example:
var CLIENT_SETTINGS = {
///...
'accept_legal_document_without_confirm': false
};
Showing the item "Activate promo code"
Option name: enable_promo_activation, data type: bool.
Shows the menu item "My profile" -> "Activate promo code". The default is false.
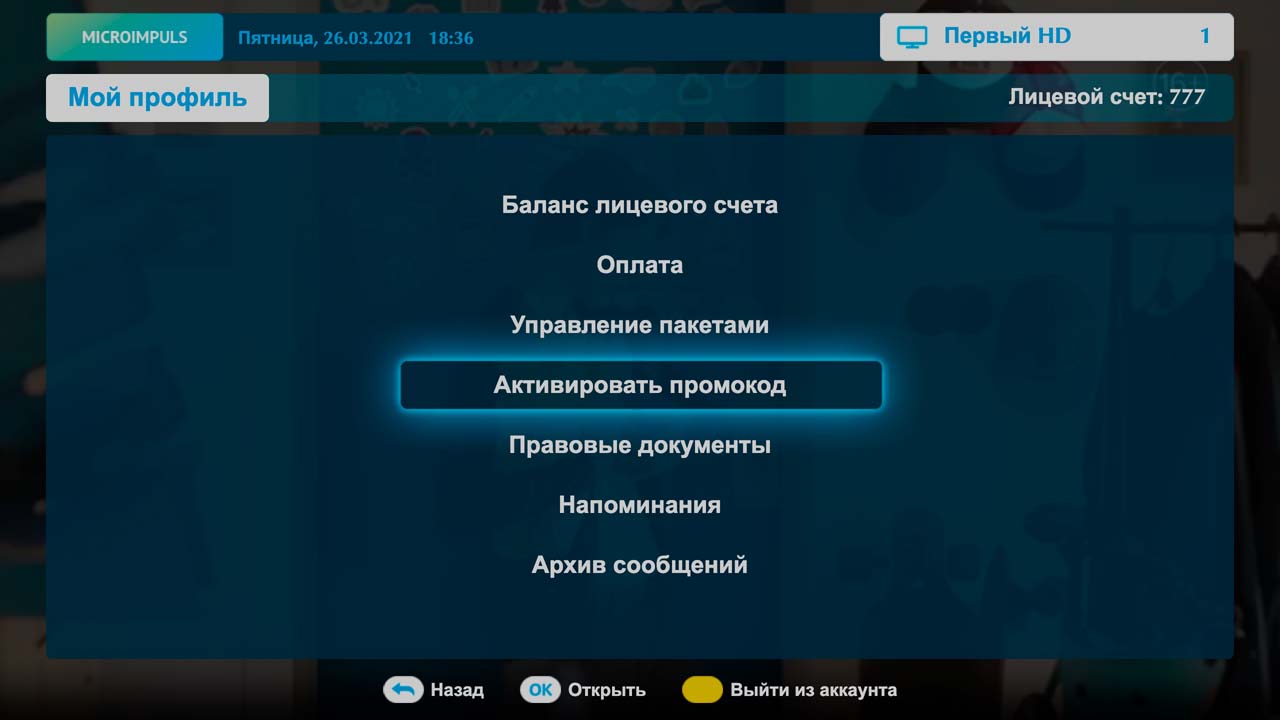
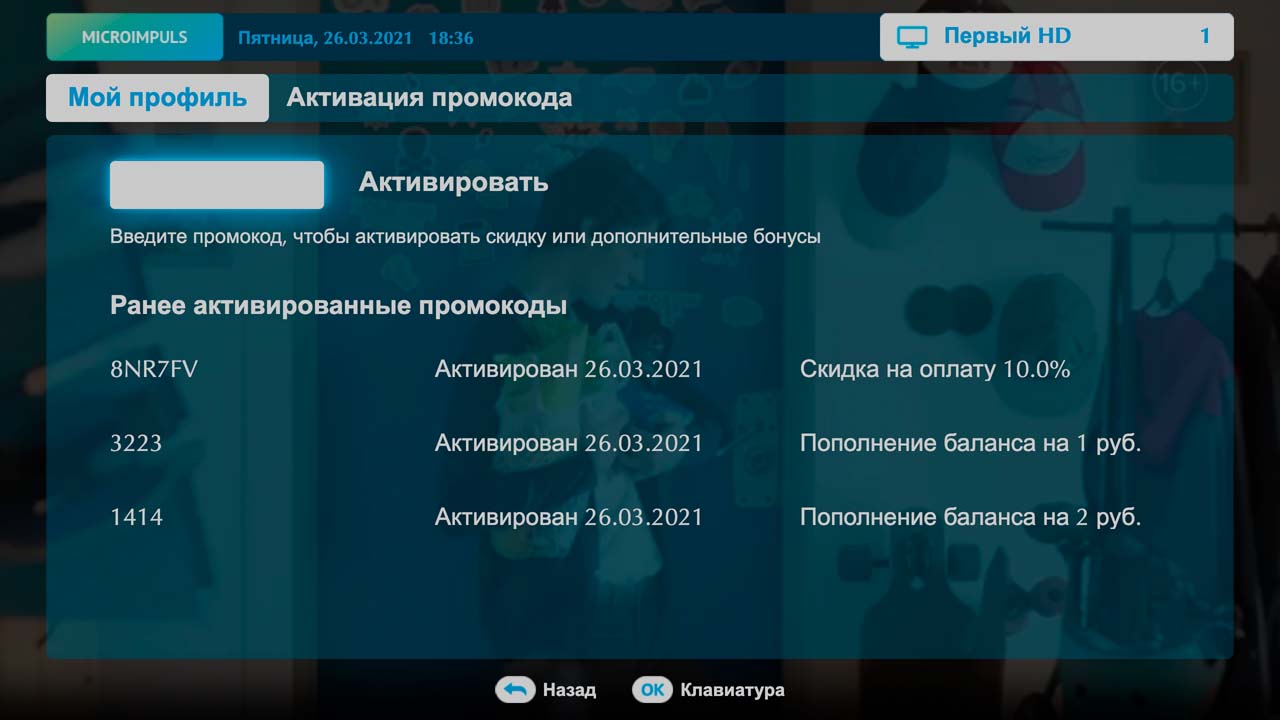
Example:
var CLIENT_SETTINGS = {
///...
'enable_promo_activation': true
};
Flag of inclusion of card binding for recourse payments
Option name: autopay_enable, data type: bool.
Possible values:
- true after successful payment with the card, its identifier will be stored for further auto payments (not supported by all) lock).
- falsely payment will be made without linking the card (by default).
Example:
var CLIENT_SETTINGS = {
///...
-autopay_enablefalse:
};
Payment page template for payment by QR
Option name: template_of_qr_pay_page, data type: string.
The option is relevant for payment gateways that have the ability to display different payment form templates (for example, for the Payture gateway).
Example:
var CLIENT_SETTINGS = {
///...
-template_of_qr_pay_page'Payture'
};
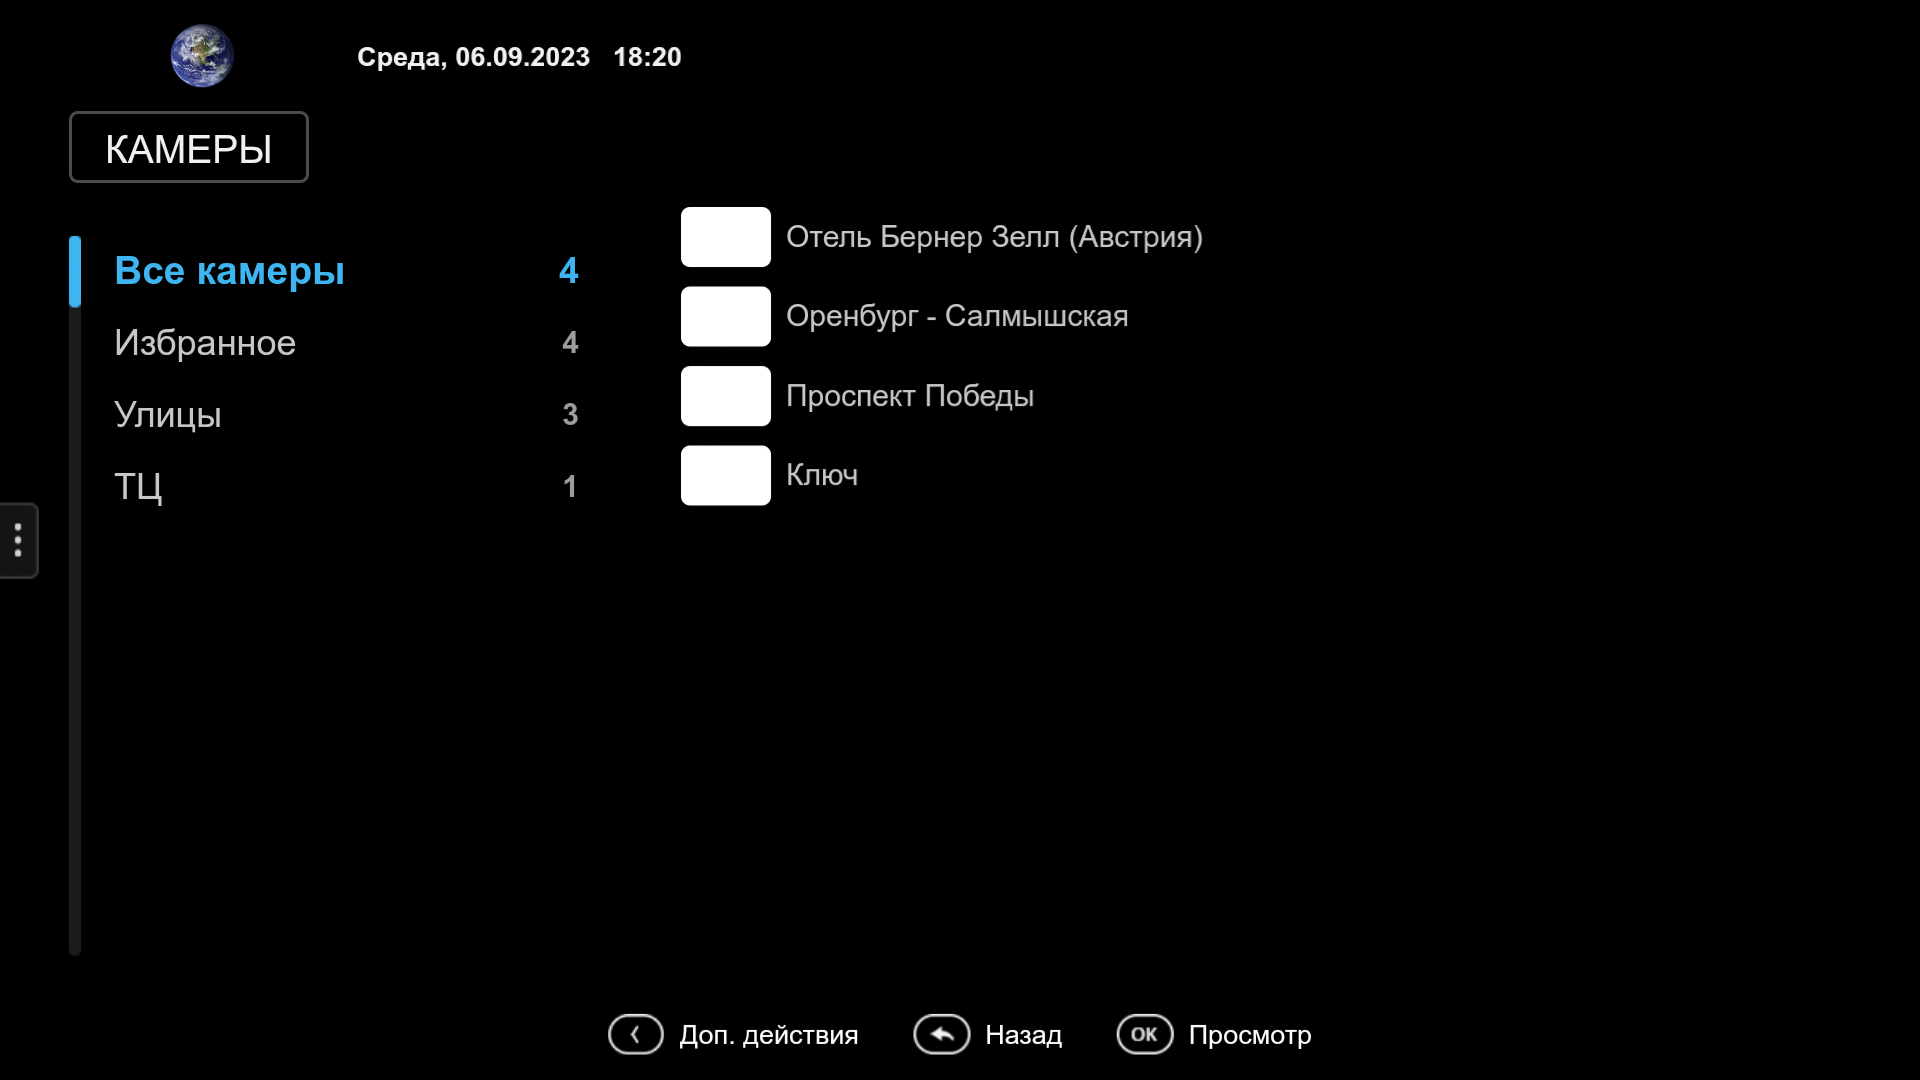
Appearance - cameras
Screen mode "Cameras"
Option name: cameras_list_mode, data type: string.

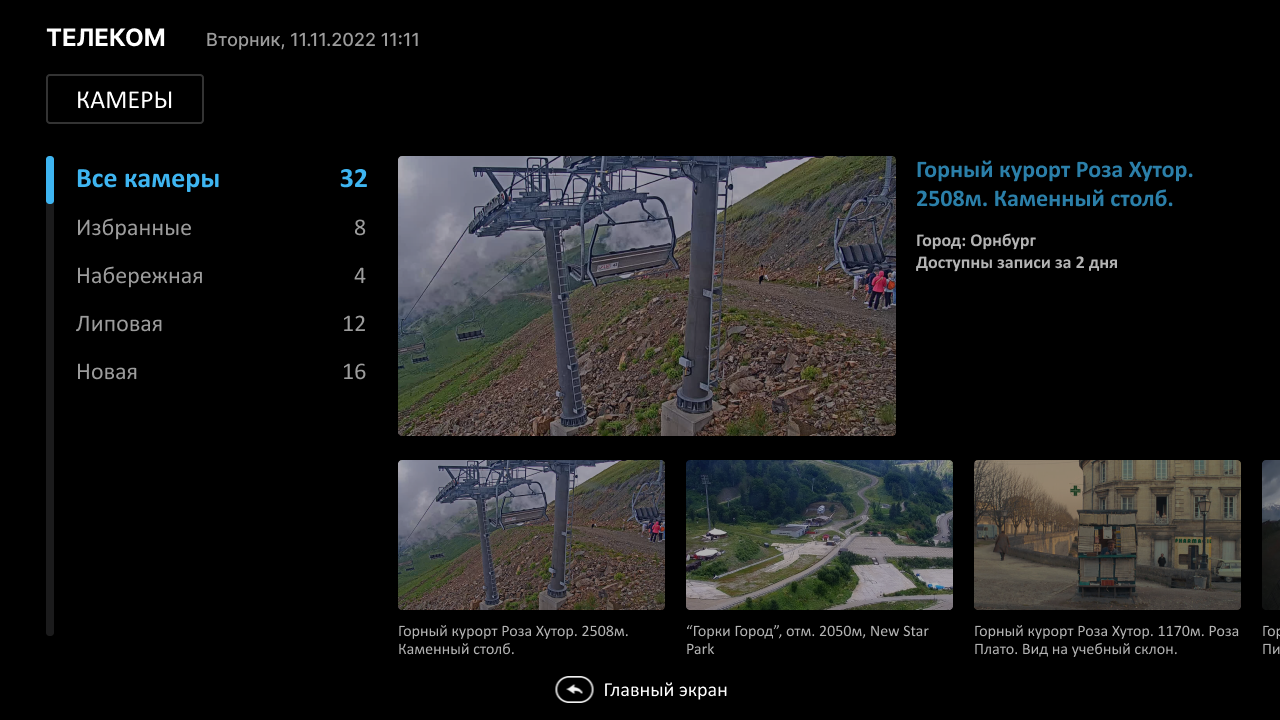
Example:
var CLIENT_SETTINGS = {
///...
"cameras_list_mode": "grid"
};
Hiding camera numbers on the list
Option name: hide_camera_number, data type: bool.
Possible values:
- true The Camera screen displays camera numbers.
- falsely there are no camera numbers in the list (by default).
Example:
var CLIENT_SETTINGS = {
///...
'hide_camera_number': false
};