To ensure load distribution on the cache between multiple servers and fault tolerance, you need to use Redis in cluster mode, as well as Smarty.
The optimal scheme is to configure the Redis Master Node on each Smarty server in Multi-Master mode. To ensure Redis fault tolerance, the minimum number of cluster servers is 3.
Instructions for setting up Redis Cluster in Multi-Master mode
For example, you need to configure 3 nodes on servers with IP addresses:
10.0.0.1
10.0.0.2
10.0.0.3
Schematically, it looks like this:
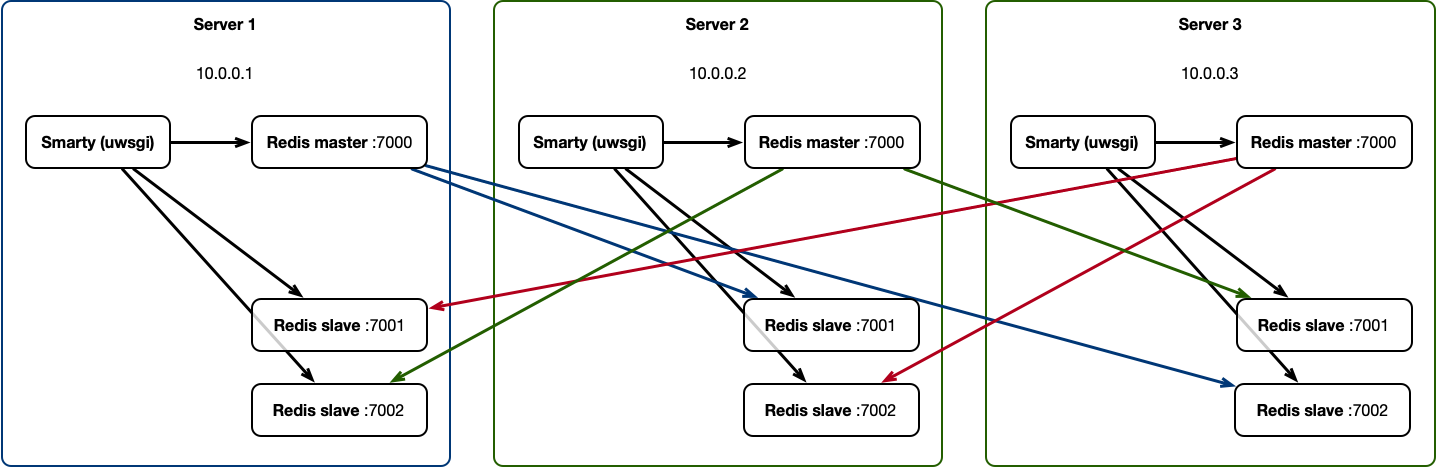
This configuration will survive the loss of two of the cluster’s three servers.
On each server must be installed redis-server version at least 3.0. It is recommended to use the latest version of Redis 5.x.
On Debian, the Redis server can be installed using the command:
apt install redis server
Configuring listening interfaces
In /etc/redis/redis.conf you need to change the option protected-mode significance noand bind into 0.0.0.0:
protected-mode no
bind 0.0.0.0
This will allow Redis to listen to connections on all interfaces.
Setting up port access
To secure the system, you must prevent access to ports 7000, 7001, 7002, 17001, 17002, 17003 on each server by default, and open access to these ports only to other nodes of the Redis cluster. For example, when using the ufw utility for iptables on the first server, you need to execute commands:
ufw allow in from 10.0.0.2 to any port 7000 proto tcp
ufw allow in from 10.0.0.2 to any port 7001 proto tcp
ufw allow in from 10.0.0.2 to any port 7002 proto tcp
ufw allow in from 10.0.0.2 to any port 17000 proto tcp
ufw allow in from 10.0.0.2 to any port 17001 proto tcp
ufw allow in from 10.0.0.2 to any port 17002 proto tcp
ufw allow in from 10.0.0.3 to any port 7000 proto tcp
ufw allow in from 10.0.0.3 to any port 7001 proto tcp
ufw allow in from 10.0.0.3 to any port 7002 proto tcp
ufw allow in from 10.0.0.3 to any port 17000 proto tcp
ufw allow from 10.0.0.3 to any port 17001 proto tcp
ufw allow from 10.0.0.3 to any port 17002 proto tcp
ufw allow out to any
On server two:
ufw allow in from 10.0.0.1 to any port 7000 proto tcp
ufw allow in from 10.0.0.1 to any port 7001 proto tcp
ufw allow in from 10.0.0.1 to any port 7002 proto tcp
ufw allow in from 10.0.0.1 to any port 17000 proto tcp
ufw allow from 10.0.0.1 to any port 17001 proto tcp
ufw allow from 10.0.0.1 to any port 17002 proto tcp
ufw allow in from 10.0.0.3 to any port 7000 proto tcp
ufw allow in from 10.0.0.3 to any port 7001 proto tcp
ufw allow in from 10.0.0.3 to any port 7002 proto tcp
ufw allow in from 10.0.0.3 to any port 17000 proto tcp
ufw allow from 10.0.0.3 to any port 17001 proto tcp
ufw allow from 10.0.0.3 to any port 17002 proto tcp
ufw allow out to any
On server three:
ufw allow in from 10.0.0.1 to any port 7000 proto tcp
ufw allow in from 10.0.0.1 to any port 7001 proto tcp
ufw allow in from 10.0.0.1 to any port 7002 proto tcp
ufw allow in from 10.0.0.1 to any port 17000 proto tcp
ufw allow from 10.0.0.1 to any port 17001 proto tcp
ufw allow from 10.0.0.1 to any port 17002 proto tcp
ufw allow in from 10.0.0.2 to any port 7000 proto tcp
ufw allow in from 10.0.0.2 to any port 7001 proto tcp
ufw allow in from 10.0.0.2 to any port 7002 proto tcp
ufw allow in from 10.0.0.2 to any port 17000 proto tcp
ufw allow in from 10.0.0.2 to any port 17001 proto tcp
ufw allow in from 10.0.0.2 to any port 17002 proto tcp
ufw allow out to any
Ports 7000, 7001, 7002 will be used to connect to Redis, and ports 17000, 17001, 17002 will be used by Redis to communicate between cluster nodes.
Installation of the utility redis-trib
On the first server, a command must be executed:
wget https://bootstrap.pypa.io/get-pip.py && python get-pip.py && rm get-pip.py
pip install redis-trib
The redis-trib utility is used to configure the cluster and manage nodes.
Installation of the Redis launch script
To easily add Redis configurations and run nodes, you need to add a service to systemd:
touch /etc/systemd/system/redis-cluster-node@service
Then write the following script into this file:
[Unit]
Description=redis cluster instance at port %i
After=network.target
Documentation=http://redis.io/documentation, man:redis-server(1)

[Service]
Type=forking=
ExecStart=/usr/bin/redis-server /etc/redis/redis.conf \
    -cluster-enabled yes \
    --dbfilename dump_%i.rdb \
    --port%i --cluster-config-file nodes_%i.conf
    --pidfile /var/run/redis/redis-server_%i.pid\
    --logfile /var/log/redis/redis-server_%i.log

PIDFile=/var/run/redis/redis-server_%i.pid
TimeoutStopSec=0
Restart=always
User=redis
Group=redis
RunTimeDirect=redis

ExecStartPre=-/bin/run-parts --verbose /etc/redis/redis-server.pre-up.d
ExecStartPost=-/bin/run-parts --verbose /etc/redis/redis-server.post-up.d
ExecStop=-/bin/run-parts --verbose /etc/redis/redis-server.pre-down.d
ExecStop=/bin/kill -s TERM $MAINPID
ExecStopPost=-/bin/run-parts --verbose /etc/redis/redis-server.post-down.d

UMask=007
PrivateTmp=yes
LimitNOFILE = 65535
PrivateDevices=yes
ProtectHome=yes
ReadOnlyDirectories=/
ReadWriteDirectories=-/var/lib/redis
ReadWriteDirectories=-/var/log/redis
ReadWriteDirectories=-/var/run/redis
CapabilityBoundingSet=~CAP_SYS_PTRACE

#redisserver writes its own config file when in cluster mode so we allow
# writing there (NB. ProtectSystem=true over ProtectSystem=full)
ProtectSystem = true
ReadWriteDirectories=-/etc/redis

[Install]
WantedBy=multi-user.target
Then execute the command:
systemctl daemon-reload
This should be done on each server of the cluster.
Recommended settings for speed
The configuration file /etc/redis/redis.conf needs an option value stop-writes-on-bgsave-error substitute no:
stop-writes-on-bgsave-error no
Also, to improve performance, it is recommended to disable persistence, but then when rebooting the Redis server, the entire cache will be reset, as a result of which some useful data for the service will be lost, for example, saved positions for watching movies and programs. To do this, comment on the options save and add save:
save
#save9001
save 300 10
#save 6010000
Addition of Redis instances
On each server it is necessary to perform:
systemctl enable redis-cluster-node@7000
systemctl enable redis-cluster-node@7001
systemctl enable redis-cluster-node@7002
Then start the added instances:
systemctl start redis-cluster-node@7000.service
systemctl start redis-cluster-node@7001.service
systemctl start redis-cluster-node@7002.service
Creation of a cluster
On the first server, you need to execute the command to create a Master-node cluster:
redis-trib.py create 10.0.0.1:7000 10.0.0.2:7000 10.0.0.3:7000
Then evenly add cluster replicas (these commands must be executed only on the first server where the redis-trib utility is installed):
redis-trib.py replicate --slave-addr 10.0.0.2:7001 --master-addr 10.0.0. 1:7000
redis-trib.py replicate --slave-addr 10.0.0.3:7002 --master-addr 10.0.0. 1:7000
redis-trib.py replicate --slave-addr 10.0.0.3:7001 --master-addr 10.0.0. 2:7000
redis-trib.py replicate --slave-addr 10.0.0.1:7002 --master-addr 10.0.0. 2:7000
redis-trib.py replicate --slave-addr 10.0.0.1:7001 --master-addr 10.0.0.3:7000
redis-trib.py replicate --slave-addr 10.0.0.2:7002 --master-addr 10.0.0.3:7000
Then you can check the list of added cluster nodes:
redis-trib.py list --addr 10.0.0. 1:7000
Attention! When adding replicas, sometimes they can connect to the wrong masters to whom it was necessary according to the cluster scheme. If this happens, remove the wrong node from the cluster and add again, for example:
redis-trib.py del_node --addr 10.0.0.3:7002
redis-trib.py replicate --slave-addr 10.0.0.3:7002 --master-addr 10.0.0. 1:7000
Cluster verification
For verification, we will write down the value bar keyed foo on the first node, and read it on the other nodes:
redis-cli -h 10.0.0.1 -p 7000 -c set foo bar
redis-cli -h 10.0.0.2 -p 7000 -c get foo
redis-cli -h 10.0.0.3 -p 7002 -c get foo
Configure the connection to the Redis cluster in Smarty
In the Smarty configuration file /etc/microimpuls/smarty/smarty.py each Smarty server must have a block CACHES as follows:
CACHES = {
"default":
"Backend": "core.cache.backends.RedisCache,"
“LOCATION”: “redis:// 10.0.0.1:7000/0","
"OPTIONS":
"REDIS_CLIENT_CLASS": "rediscluster.client.RedisCluster,"
"REDIS_CLIENT_KWARGS": {"read_from_replicas: True },
"CONNECTION_POOL_CLASS": "core.cache.cluster_connection.ClusterConnectionPool,"
"CONNECTION_POOL_KWARGS": {
"startup_nodes":
{"host": "10.0.0.1", "port": "7000", "server_type: "master"},
{"host": "10.0.0.1", "port": "7001", "server_type: "slave"},
{"host": "10.0.0.1", "port": "7002", "server_type: "slave"},
]
}
}
}
}
As a value LOCATION on each server you must specify the address of the local node Redis cluster, and in the block startup_nodes specify the local master node and slay nodes of the cluster.
Recovery of the damaged Redis cluster
Partial recovery of the cluster
If there is a loss of several nodes of the cluster (for example, two), then the following steps must be performed to restore the cluster on the remaining server (for example, server 10.0.0.1).
Lifting two new nodes:
systemctl start redis-cluster-node@8000
systemctl start redis-cluster-node@8001
Restore data from the remaining working node:
redis-trib.py rescue --existing-addr 10.0.0.1:7000 --new-addr 10.0.0. 1:8000
redis-trib.py rescue --existing-addr 10.0.0.1:7000 --new-addr 10.0.0.1:8001
Full recovery of the cluster
On all servers stop all processes of cluster radish
systemctl stop redis-cluster-node@7000
systemctl stop redis-cluster-node@7001
systemctl stop redis-cluster-node@7002
Then remove all files from the /var/lib/redis/.
Re-start instances and create a cluster, as in the initial configuration.